CrewAI is a Python-based solution that uses agents, tasks, and crews to work with autonomous AI agents. This tutorial will guide you through creating a crew of agents using CrewAI and Ollama on Lightning AI, a cloud-based platform that provides a visual coding experience similar to Visual Studio Code.
You can also apply these concepts locally without any modifications.
If you're more of a visual learner or simply want to see how it's done, I recommend checking out my YouTube tutorial. It covers everything step-by-step.
Prerequisites
- Sign up for Lightning AI or set up Visual Studio Code locally
- Install Ollama (if working locally). You'll find a guide in my blog post Run Your Own AI Locally: A Guide to Using Ollama
Steps
1. Create a New Lightning Studio from Template
- Use the Lightning AI studio template with Ollama pre-installed: Ollama Starter Kit
- Update the path variable in the
.studiorcconfiguration file with the Ollama installation path by adding the following line:export PATH="/teamspace/studios/this_studio/bin:${PATH}" - Rename the studio to a fitting name
- Open a terminal in VSCode and start Ollama by running:
ollama serve - Verify Llama 3.1 and 3.2 installation using
ollama_listin a separate terminal window. You should be seeing both models appear in the list.

2. Create a CrewAI Project
- Install CrewAI and CrewAI Tools packages by running:
pip install crewai crewai-tools - Create a new crew called
research_crewusing:crewai create crew research_crewThis will set up a whole project structure for us, including a pre-built template crew that we can use right away with minimal tweaks.
The name "Research Crew" comes from the fact that the CrewAI template generates a crew of researchers automatically – and all you need to do is make a few adjustments to get it up and running.
3. CrewAI Project Walkthrough
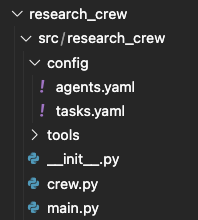
Explore the generated project structure
main.py: Contains functions to interact with the Research Crew. For example, therunfunction initializes and runs the Research Crew with a predefined {topic}.crew.py: Defines the crew members, agents, and tasks using python decorators such as @agent, @task, or @crew. These decorators make it easier to create agents, tasks, and even the crew itself. For instance, there's an @agent decorator that simplifies the process of adding new agents. When we use this decorator, it automatically adds our newly created agent, like 'Researcher', to the crew's list of team members.configfolder: Contains YAML files for agent and task definitions
Agent Definition
- Each agent has a role, goal, and backstory
- Use variables (for example,
{topic}) for customization - Be specific when defining agents for best results
researcher:
role: >
{topic} Senior Data Researcher
goal: >
Uncover cutting-edge developments in {topic}
backstory: >
You're a seasoned researcher with a knack for uncovering the latest
developments in {topic}. Known for your ability to find the most relevant
information and present it in a clear and concise manner.
reporting_analyst: role: > {topic} Reporting Analyst goal: > Create detailed reports based on {topic} data analysis and research findings backstory: > You're a meticulous analyst with a keen eye for detail. You're known for your ability to turn complex data into clear and concise reports, making it easy for others to understand and act on the information you provide.
Task Definition
- Each task has a description and expected output
-
Tasks are assigned to agents best suited for the work
research_task:
description: >
Conduct a thorough research about {topic}
Make sure you find any interesting and relevant information given
the current year is 2024.
expected_output: >
A list with 10 bullet points of the most relevant information about {topic}
agent: researcher
reporting_task: description: > Review the context you got and expand each topic into a full section for a report. Make sure the report is detailed and contains any and all relevant information. expected_output: > A fully fledge reports with the mains topics, each with a full section of information. Formatted as markdown without '```' agent: reporting_analyst
4. Make Changes to the Crew
Update main.py File
- Modify the research topic in
main.py(for example, "Improving Personal Productivity in the Workplace")def run(): """ Run the crew. """ inputs = { 'topic': 'Improving personal productivity in the workplace' } ResearchCrewCrew().crew().kickoff(inputs=inputs)
Update crew.py File
Use Ollama as the default LLM:
- Import the LLM class from the CrewAI module:
from crewai import LLM - Define the Llama 3.2 model and URL where Ollama is running:
llama3_2 = LLM(model="ollama/llama3.2", base_url="http://localhost:11434") -
Assign the
llmparameter to theLlama 3.2instance in the agent definitions@agent def researcher(self) -> Agent: return Agent( config=self.agents_config['researcher'], llm=llama3_2, # tools=[MyCustomTool()], # Example of custom tool, loaded on the beginning of file verbose=True ) @agent def reporting_analyst(self) -> Agent: return Agent( config=self.agents_config['reporting_analyst'], llm=llama3_2, verbose=True )
5. Run the Crew
- Navigate to the project folder:
cd research_crew - Install dependencies by running
crewai install - Run the crew using
crewai run - Observe the agents working on the research and reporting tasks
- View the final output in the generated "report.md" file

Conclusion
You have now successfully created a crew of agents using the CrewAI template and integrated it with Ollama. Feel free to expand and customize the crew to suit your needs by modifying, adding, or experimenting with the agents to achieve your desired outcomes.

