This is Part 5 of the ComfyUI Masterclass series, where we explore the powerful features of ComfyUI for AI image generation. Here's what we've covered so far:
- Part 1: Install and Run ComfyUI deals with installing ComfyUI on lightning.ai, a cloud platform that’s beneficial if you don’t have much GPU power. Since the installation steps are the same as for local installation, you can follow along regardless of your preferred setup
- Part 2: Nodes and Workflows covers the ComfyUI interface, essential node types, and how to build a complete text-to-image workflow from scratch, including workflow organization techniques
Did you know that using the wrong batch settings in ComfyUI could slow down your workflow by up to 400%? - Part 3: The KSampler explores the settings that control your image generation.
- Part 4: Batch Processing, explores everything you need to know about batch processing in ComfyUI, from basic concepts to advanced workflow optimization techniques.
The image-to-image workflow in ComfyUI offers a powerful way to transform existing images rather than generating completely new ones from scratch. This approach gives you more control and predictability in your AI art creation process by using a reference image as a starting point.
If you're more of a visual learner or simply want to see how it's done, I recommend checking out my YouTube tutorial. It covers everything step-by-step.
Understanding Image-to-Image vs Text-to-Image
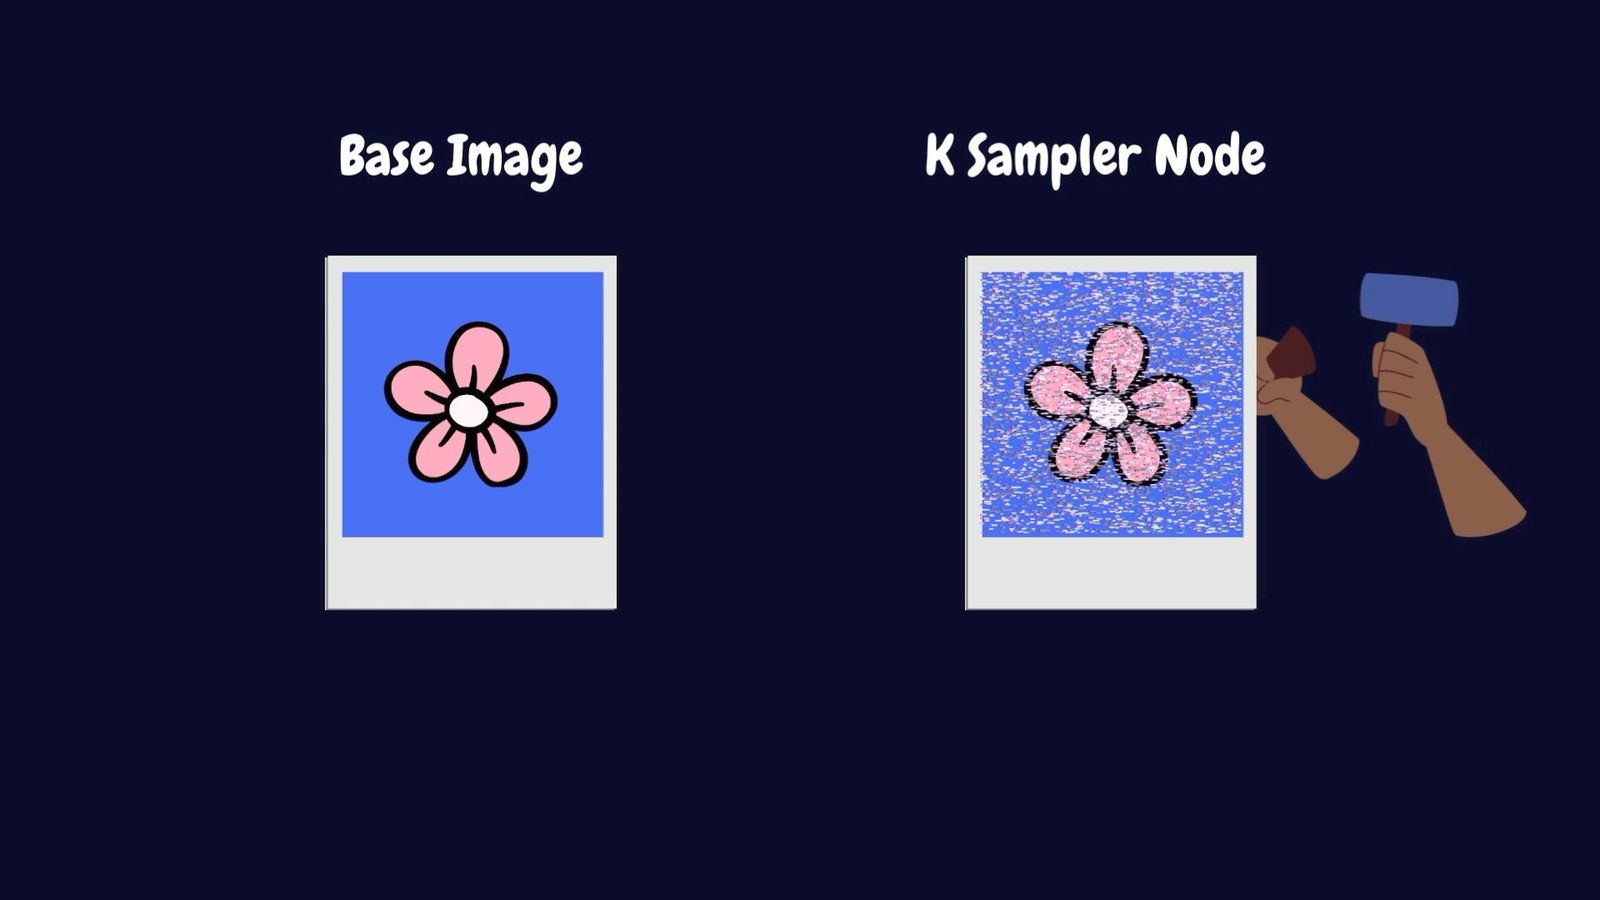
In the standard text-to-image workflow (covered in previous parts of this series), the process begins with an Empty Latent Image node that creates a blank canvas. The KSampler then fills this canvas with random noise based on a seed value before progressively removing the noise guided by your prompt.
Image-to-image takes a different approach. Instead of starting with a blank canvas, you begin with an existing image that serves as a blueprint for the AI to work with. This reference image influences the final output, allowing you to preserve certain elements while transforming others according to your prompt.
The difference is similar to a sculptor starting with raw marble versus one who begins with a roughly shaped form. The second sculptor has a head start because some of the basic structure is already in place.
Setting Up an Image-to-Image Workflow
To create an image-to-image workflow in ComfyUI, you'll need to make a few adjustments to the standard text-to-image setup:
- Remove the Empty Latent Image node from your workflow
- Add a Load Image node to import your reference image
- Connect a VAE Encode node to convert your regular image into the latent format that the AI can understand
- Connect the latent output from the VAE Encode node to the KSampler's latent image input
- Connect your model to the VAE Encode node's VAE input
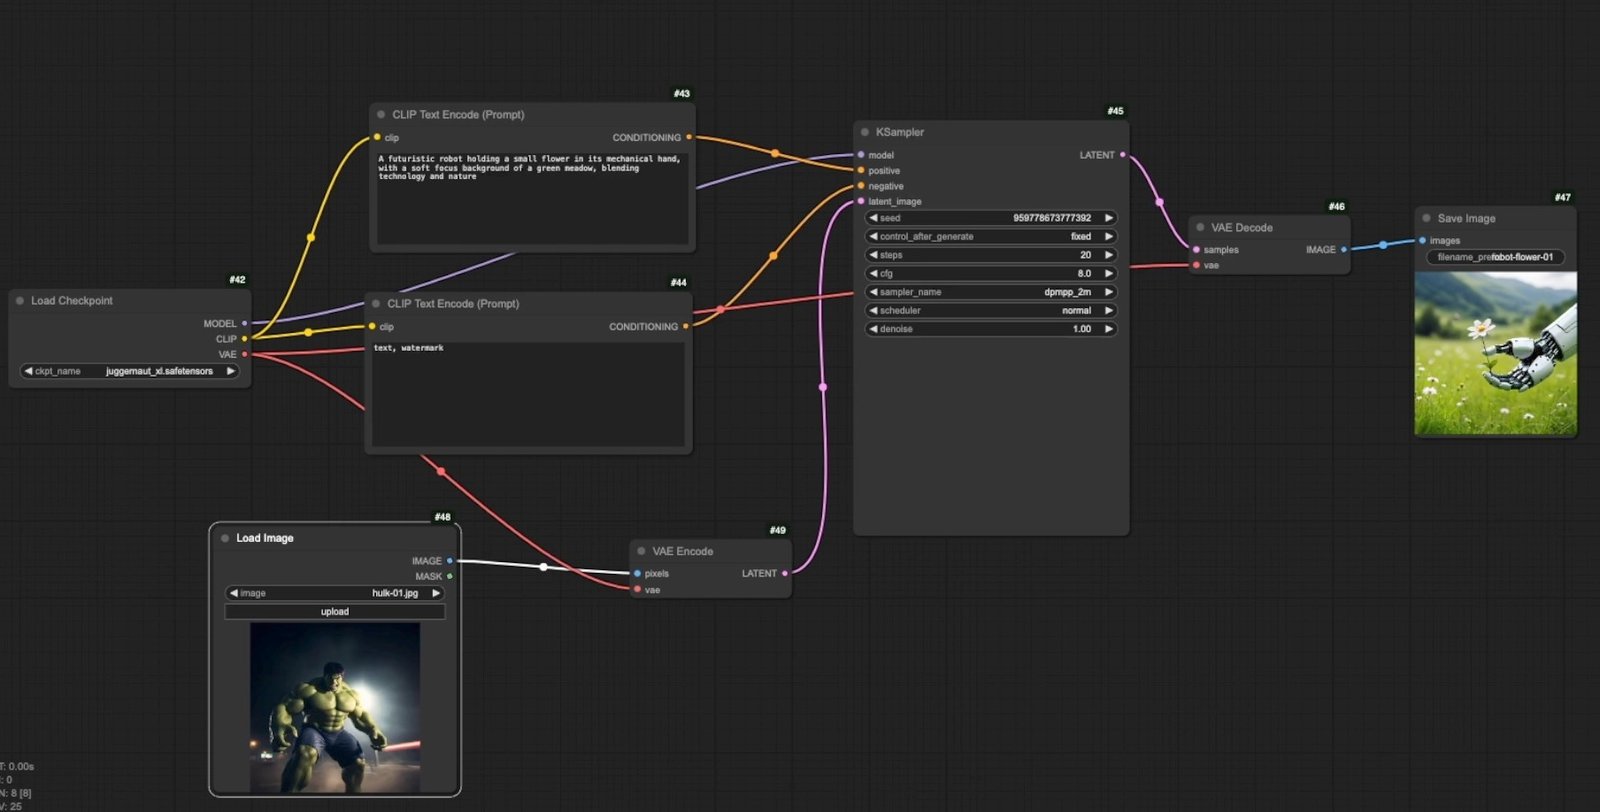
Once these connections are in place, your basic image-to-image workflow is ready to run.
The Critical Denoise Parameter
When first running an image-to-image workflow, you might notice that the output appears identical to your input image. This happens because the denoise parameter in the KSampler node is set to its default value of 1.0.
The denoise parameter (ranging from 0 to 1) controls how much of your original image is preserved versus how much is transformed. Here's how it works:
- Low denoise values (0.1-0.3): The output stays very close to the original image with minor modifications
- Medium denoise values (0.4-0.7): A balanced transformation that preserves some elements while significantly altering others
- High denoise values (0.8-1.0): Almost complete transformation, with minimal influence from the original image
This parameter is so important because it determines the "creative freedom" given to the AI. With a low denoise value, the AI has little room to make changes. With a high value, it can dramatically reimagine the image according to your prompt.

The Science Behind Denoising
The denoising process in image-to-image workflows directly mimics how diffusion models like Stable Diffusion are trained. During training, these models learn by seeing millions of images that are progressively corrupted with noise, then learning to reverse this process to reconstruct clean images.
When using the KSampler, this process happens in three main stages:
-
Adding noise: The KSampler introduces random noise into the latent representation of your base image. The amount depends on the denoise strength parameter.
-
Guided denoising: The AI then removes this noise step by step, using your prompts as guidance. Positive prompts indicate what should be emphasized, while negative prompts specify what to avoid. The CFG setting controls how strictly the AI follows these prompts.
-
Final output: Once all steps are complete, the noise is fully or partially removed, resulting in an image that combines elements of your original image with the characteristics described in your prompt.
This approach gives the AI the "creative space" needed to transform your image while maintaining some connection to the original reference.
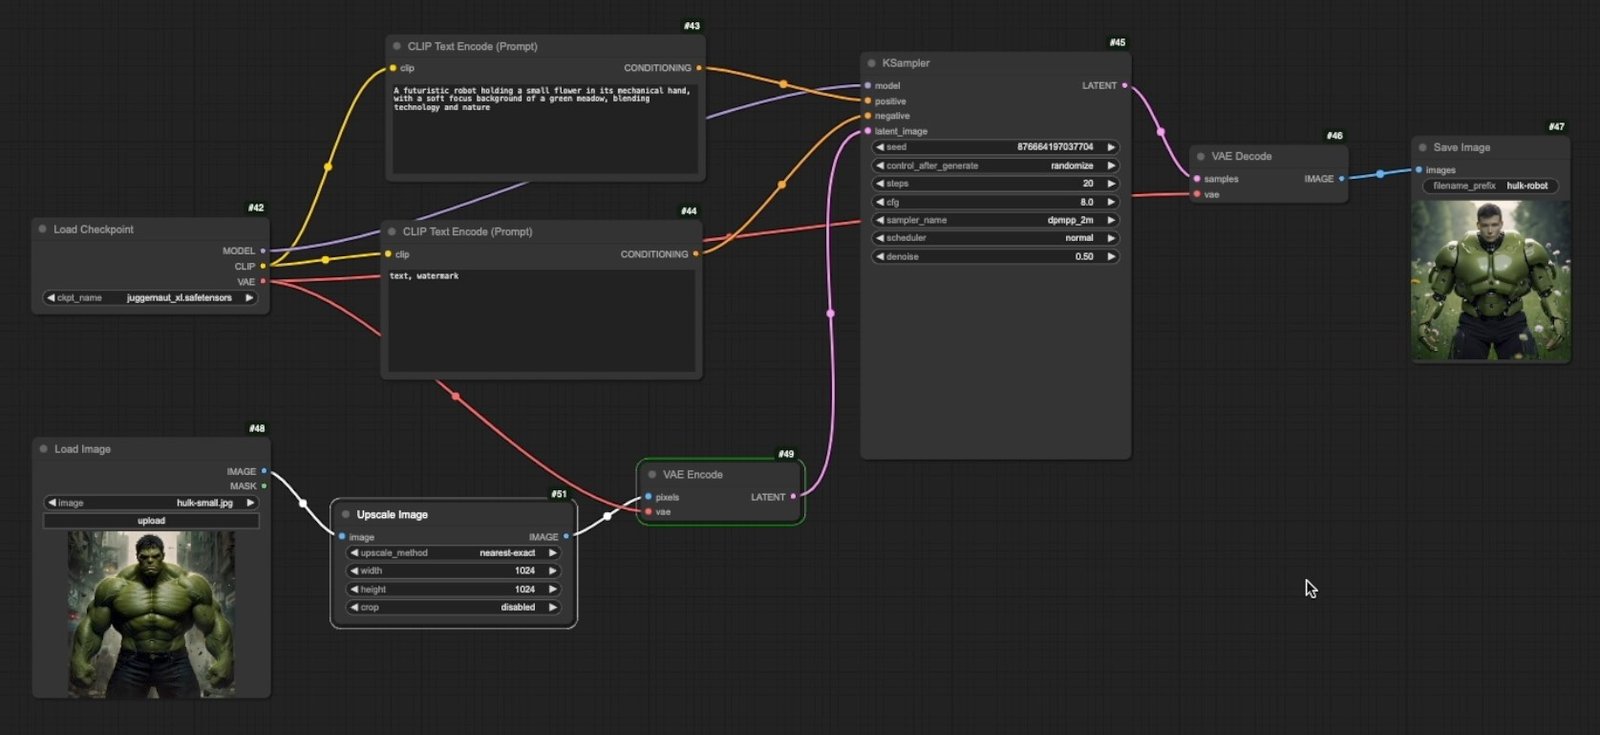
Managing Image Size in Image-to-Image Workflows
Unlike text-to-image workflows where you can specify dimensions in the Empty Latent Image node, the output size in image-to-image is automatically determined by your input image dimensions. This can be limiting if your reference image isn't the optimal size for your AI model.
For example, SDXL models work best with 1024x1024 pixel images. If your reference image is smaller (like 896x896), your output will also be limited to that size, potentially reducing quality.
Fortunately, ComfyUI provides the Upscale Image node to address this issue. This versatile node can:
- Increase the resolution of smaller images to reach optimal dimensions
- Decrease the resolution of larger images to save VRAM and processing time
- Maintain or change aspect ratios as needed
To use this node, simply:
- Connect it between your Load Image node and VAE Encode node
- Set your desired output dimensions (e.g., 1024x1024)
- Choose an appropriate upscaling method
Upscaling Methods Compared
The Upscale Image node offers several methods, each with distinct characteristics:
Nearest-Exact
- Duplicates pixels to fill space
- Best for: Pixel art/hard-edge preservation
- ⚡ Ultra-fast processing
- ⚠️ Creates blocky artifacts on smooth images
Bilinear
- Averages 4 nearest pixels
- Best for: General-purpose upscaling
- ⚡ Balanced speed/quality
- ⚠️ Blurring on large upscales
Area
- Calculates pixel averages
- Best for: Downscaling tasks
- ✅ Maintains detail when reducing size
- ⚠️ Loses sharpness when upscaling
Bicubic
- Analyzes 16 surrounding pixels
- Best for: High-quality photo upscaling
- 🌟 Smoother gradients than Bilinear
- ⚠️ Moderate computational load
Lanczos
- Uses sinc function interpolation
- Best for: Maximum detail retention
- 🔍 Sharpest results for high-res outputs
- ⚠️ Heavy processing + possible halo artifacts
Recommendations
- 🎮 Pixel art: Nearest-Exact
- 🖼️ General use: Bilinear/Bicubic
- 🏞️ Premium quality: Lanczos (with GPU)
- 📉 Downscaling: Area
Handling Different Aspect Ratios
When working with non-square images (like landscape or portrait orientations) but needing square outputs for your AI model, you have two options in the Upscale Image node:
- No cropping (default): Stretches or compresses the image to fit the target dimensions, which can distort the image
- Center crop: Takes the center portion of your image to create a properly proportioned square, discarding content from the edges
The center crop option typically produces more natural-looking results, though you'll lose some content from the sides of your original image.
Creating Multi-Stage Transformations
One powerful technique in image-to-image workflows is the ability to use your outputs as new inputs, creating a multi-stage transformation process.
To reuse a generated image:
- Right-click on your output image and select "Copy Image"
- Go to your Load Image node, click on the image preview area, and paste using Ctrl+V on Windows or ⌘+V on macOS.
This approach allows for progressive refinement, similar to a digital artist working through multiple passes on the same canvas. Each iteration can apply different styles, prompts, or denoise settings, building upon the previous result.
Conclusion
Image-to-image workflows in ComfyUI provide tremendous creative control over your AI art generation process. By understanding the denoise parameter, managing image sizes appropriately, and leveraging multi-stage transformations, you can guide the AI to produce results that align closely with your creative vision.
The techniques covered in this article are just the beginning. Advanced approaches like inpainting specific areas, using control nets for precise guidance, and combining multiple reference images will be explored in future articles.
Download the Workflow
You can download the workflow shown in this tutorial here.
ComfyUI Masterclass Part 6
In part 6 of our series you'll learn how you can change the image-to-image workflow to allow inpainting and outpainting for editing images.