This is Part 6 of the ComfyUI Masterclass series, where we explore the powerful features of ComfyUI for AI image generation. Here's what we've covered so far:
- Part 1: Install and Run ComfyUI deals with installing ComfyUI on lightning.ai, a cloud platform that’s beneficial if you don’t have much GPU power. Since the installation steps are the same as for local installation, you can follow along regardless of your preferred setup
- Part 2: Nodes and Workflows covers the ComfyUI interface, essential node types, and how to build a complete text-to-image workflow from scratch, including workflow organization techniques
Did you know that using the wrong batch settings in ComfyUI could slow down your workflow by up to 400%? - Part 3: The KSampler explores the settings that control your image generation.
- Part 4: Batch Processing, explores everything you need to know about batch processing in ComfyUI, from basic concepts to advanced workflow optimization techniques.
- Part 5: Image to Image explores everything you need to know about image-to-image workflows in ComfyUI.
If you're more of a visual learner or simply want to see how it's done, I recommend checking out my YouTube tutorial. It covers everything step-by-step:
Understanding the Techniques
Inpainting is a powerful technique that allows you to edit specific parts of a picture and transform them into something completely different. This versatile approach can be used to remove unwanted objects like photobombers or power lines from photos, fix scratches in old photographs, or add new elements such as placing a hat on someone's head.
Outpainting, on the other hand, expands your image beyond its original boundaries by generating new content that seamlessly blends with what's already there. Unlike inpainting which works within existing image areas, outpainting adds elements around the edges, creating a larger canvas while preserving the original composition.
Setting Up With Specialized Models
For a foundation in both techniques, you'll need to start with an image. This initial image can be generated using a text-to-image workflow.
While regular models like Juggernaut XL can be used for both inpainting and outpainting, specialized models specifically trained for these tasks yield more impressive results. The Juggernaut XL inpainting model from Civitai is one such example. Adding new models follows the same process as installing and running ComfyUI itself.
Building the Inpainting Workflow
Starting with a basic workflow (similar to what might be used for image-to-image conversion), you'll need to load a checkpoint file containing your inpainting model. The KSAMPLER node should have settings adjusted based on the model's recommendations.
To modify the workflow for inpainting, you'll need to add the "Inpaint Model Conditioning" node. This node controls how AI fills in missing parts of an image. When connecting this node to the workflow, the inputs and outputs should be matched by color:
- Connect the positive output from prompts to the positive input of the new node
- Connect the negative output to the negative input
- Link this new node to the KSAMPLER
If your inpainting model has VAE baked in (check the model's documentation), you can connect the VAE output from the Load Checkpoint node directly to the VAE input of the Inpaint Model Conditioning node. The latent output of this new node should connect to the latent image input of the KSAMPLER. With this setup, the VAE Encode node is no longer needed as the new node handles that encoding process.

Installing Custom Nodes
We will also need custom nodes. A custom node in ComfyUI is essentially a user-defined module that extends the platform's functionality beyond standard features. This is a significant benefit of ComfyUI being open-source - developers worldwide contribute valuable extensions.
To install custom nodes, navigate to the ComfyUI Manager and click on "Custom Nodes Manager." Search for "inpaint crop" and look for "ComfyUI inpaint crop and stitch." Select the latest version and install. After installation, restart ComfyUI and refresh your browser.
Once restarted, these new nodes will appear in the node library under the "inpaint" folder. The installation adds four separate nodes that will be used throughout the inpainting and outpainting process.
Adding Specialized Inpainting Nodes
Two key specialized nodes are needed: Inpaint Crop and Inpaint Stitch. The Inpaint Crop node prepares the image before it goes through the KSAMPLER by focusing specifically on the part to be edited. The Inpaint Stitch node takes the edited portion and seamlessly blends it back into the original image.
To connect these to the workflow:
- Connect the image output from the Load Image node to the image input of the Inpaint Crop node
- Connect the mask output to the mask input of the Inpaint Crop node
- Connect the cropped image output to the pixels input of the Inpaint Model Conditioning node
- Connect the cropped mask output to its mask input
For the Inpaint Stitch node:
- Connect it after the VAE Decode node
- Route its image output to the image input of the Save Image node
- Connect the stitch output from the Inpaint Crop node with the stitch input of the Inpaint Stitch node
If any connections are missed, ComfyUI will alert you when running the workflow.

Using the Mask Editor
The mask editor is where you define exactly which parts of the image to change. Access it by right-clicking on the Load Image node and selecting "Open in Mask Editor."
The brush tool allows you to mark areas for editing. You can customize its shape (round or square), thickness (size), opacity (transparency), hardness (edge softness), and smoothing precision (how it follows movements).
In the layers section, both the mask and image layers have toggle switches. These can be turned on or off to focus on fine-tuning the mask or checking its alignment with the underlying image.
Mask Editor Controls
The top toolbar in the mask editor contains several important controls:
- Undo and redo arrows for stepping through recent changes
- Invert button that flips mask colors (black to white and vice versa)
- Clear button that removes all mask edits
- Save button that saves current mask edits and exits the editor
- Cancel button that discards changes made during the editing session
The tools on the left side include:
- Brush Tool for drawing or painting the mask manually
- Eraser Tool for removing parts of the existing mask (perfect for refining edges)
Inpainting in Action
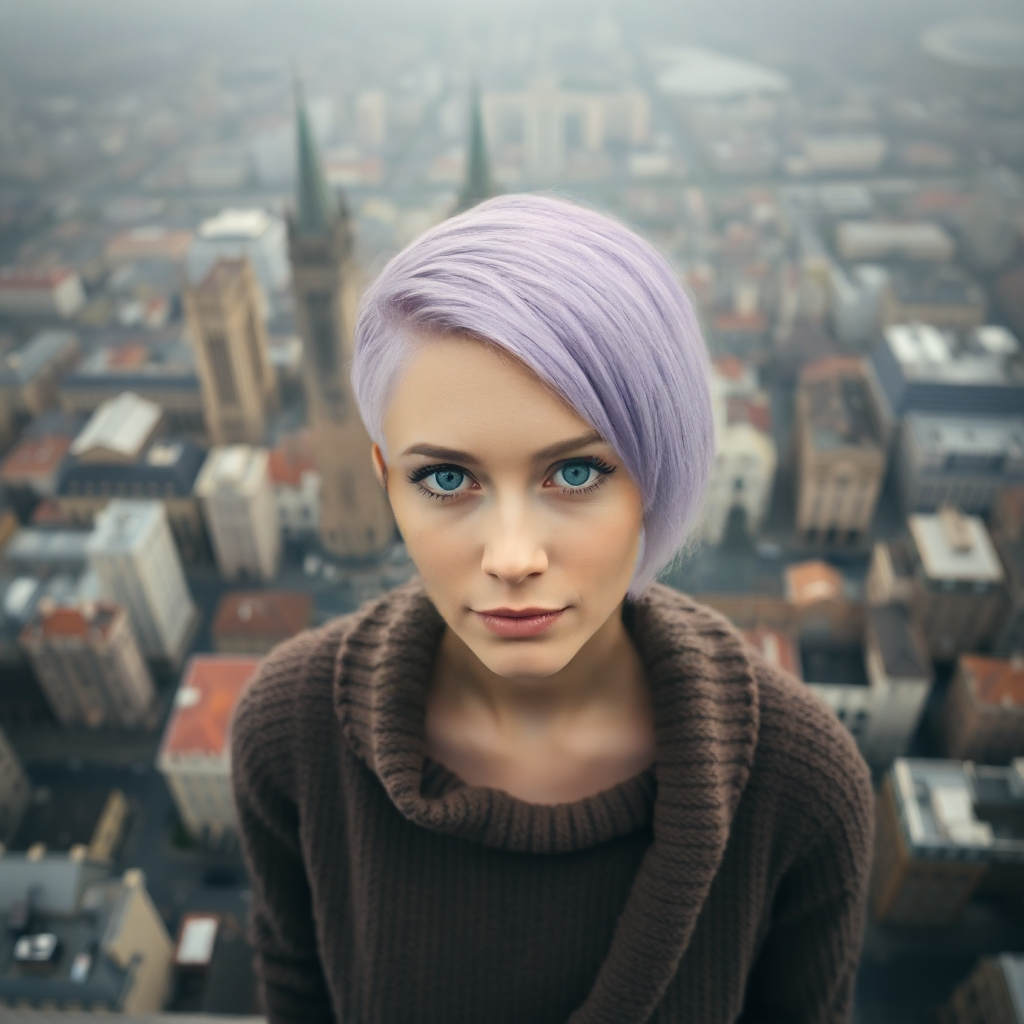
To change hair color using inpainting, cover all the hair using the brush tool in the mask editor. After saving the mask, specify what to create by entering "purple hair" in the positive prompt field, then run the workflow.
The result will replace the original hair with new hair. The haircut might be different when comparing both images, and the color might not match expectations perfectly. Adjusting the KSAMPLER parameters, particularly increasing the denoise value from 0.8 to 0.9, gives the AI more creative freedom.
When regenerating with new parameters, the color might remain similar while the haircut changes completely. This highlights the trial-and-error nature of inpainting - several attempts may be needed to achieve the desired result.
More Inpainting Examples
Inpainting's versatility extends beyond hair color changes. By drawing a mask on the original image and defining what you want in the prompt, you can add virtually anything - glasses, accessories, or other elements.

Optimizing Inpainting Results
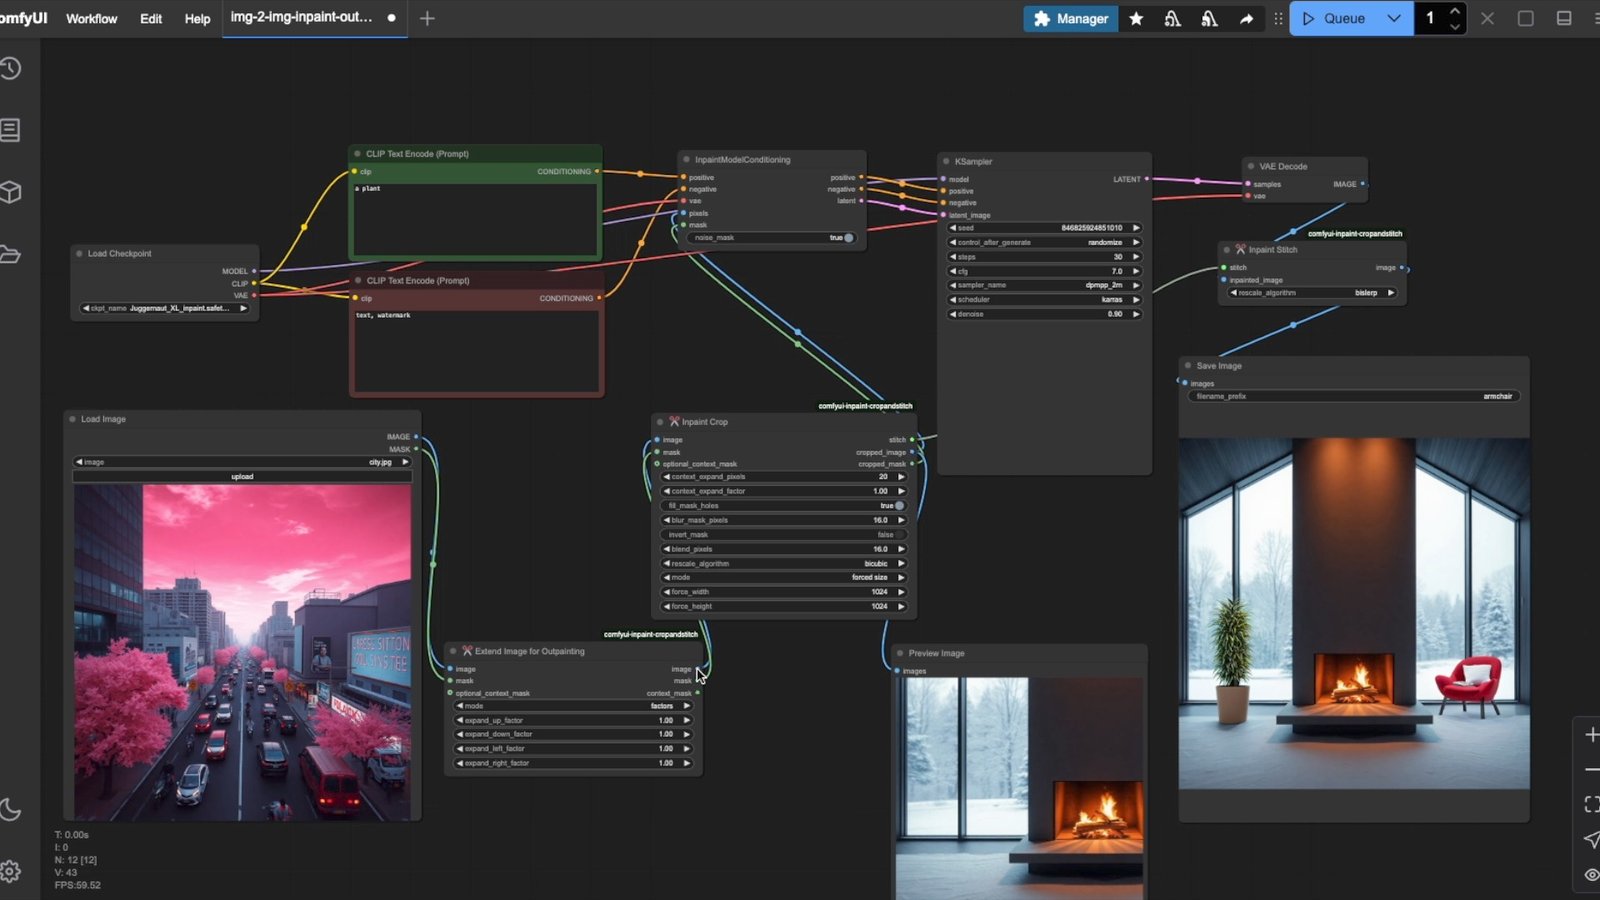
To understand the process better, adding a preview node after the Inpaint Crop node reveals what happens behind the scenes. The Inpaint Crop node extracts just the masked portion and passes only that section to the KSAMPLER. Then the Inpaint Stitch node seamlessly blends everything back together.
Several parameters in the Inpaint Crop node can be adjusted to improve results:
- Expand factor: Changing this increases or decreases how much surrounding area is included in the crop. A larger area gives the KSAMPLER more context about the surrounding environment, helping it make better decisions about the masked area.
- Upscaling or downscaling: These affect the resolution of the processed area.
- Mask blur factor: This determines how much softening occurs around the edges of newly generated content.
If you're particularly happy with an output and want to use it as a new starting point, right-click on the output image, select "copy," then go to the Load Image node and paste it.
Introduction to Outpainting
Outpainting allows expanding an image beyond its original boundaries, creating new content that seamlessly blends with what's already there.
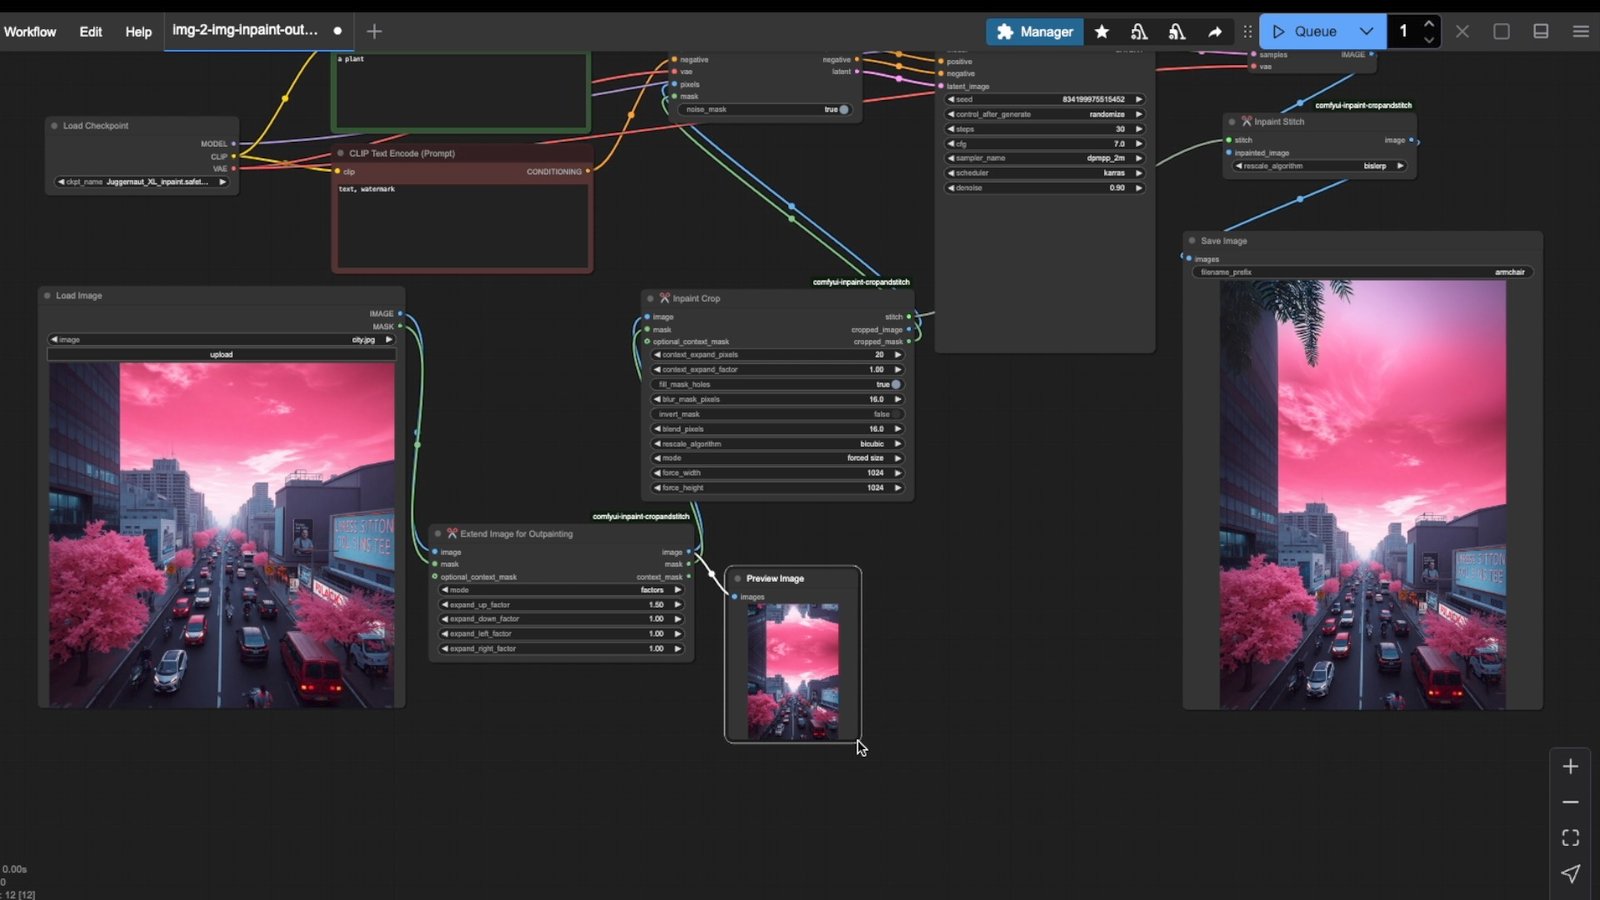
To implement outpainting, add the "Extend Image for Outpainting" node (one of the custom nodes installed earlier). This node should be placed between the Load Image node and the Inpaint Crop node. Adding a preview node after the outpainting node helps visualize the process.
Outpainting in Action
The outpainting node allows expanding the original image in any direction. For example, selecting "expand up factor" and increasing it by 50% adds additional space to the upper part of the image.
When running this workflow, the Extend Image for Outpainting node adds an inverted copy of the image to the upper portion. The Inpaint Crop node focuses on the specific part that the AI should generate. The KSAMPLER removes the noise and generates a continuation of the scene for the original image.
Conclusion & Download
Through inpainting and outpainting, ComfyUI offers powerful tools for image manipulation, allowing precise editing of existing images or expansion beyond original boundaries. These techniques open up creative possibilities that were once impossible, making ComfyUI an invaluable tool for digital artists and photographers alike.
You can download the workflow shown in this tutorial here.
Please note that the custom nodes in this workflow have been updated. The 'crop' node now supports both inpainting and outpainting. You are downloading the latest version.
ComfyUI Masterclass Part 7
In part 7 of our series you'll learn how to install and run FLUX 1 models in ComfyUI.