This is Part 8 of the ComfyUI Masterclass series, where we explore the powerful features of ComfyUI for AI image generation. Here's what we've covered so far:
- Part 1: Install and Run ComfyUI deals with installing ComfyUI on lightning.ai, a cloud platform that’s beneficial if you don’t have much GPU power. Since the installation steps are the same as for local installation, you can follow along regardless of your preferred setup
- Part 2: Nodes and Workflows covers the ComfyUI interface, essential node types, and how to build a complete text-to-image workflow from scratch, including workflow organization techniques
Did you know that using the wrong batch settings in ComfyUI could slow down your workflow by up to 400%? - Part 3: The KSampler explores the settings that control your image generation.
- Part 4: Batch Processing, explores everything you need to know about batch processing in ComfyUI, from basic concepts to advanced workflow optimization techniques.
- Part 5: Image to Image explores everything you need to know about image-to-image workflows in ComfyUI.
In our ComfyUI Masterclass series, we've been focusing on SDXL-based models until now. Today, we're exploring something different and exciting: the Flux family of models. - Part 6: Inpainging and Outpainting shows you how you can use inpainting and outpainting in ComfyUI to edit your images.
- Part 7: How to Install and Run Flux 1 Dev and Schnell explains how to run Flux 1 Dev and Schnell models in ComfyUI.
If you're more of a visual learner, I recommend checking out my YouTube tutorial. It covers everything step-by-step:
What Are LoRAs?
LoRA stands for "Low Rank Adaptation." It is a technique that allows users to fine-tune AI models to specific styles or subjects by making targeted adjustments, rather than retraining the entire model. This approach is both cost-effective and resource-efficient. With LoRAs, models can be specialized to generate images of particular objects, characters, or art styles.
LoRAs can be trained independently or downloaded as pre-trained models from popular platforms such as HuggingFace or CivitAI. They are typically distributed as TensorFlow files, which can be used directly in ComfyUI.
Where to Find and Download LoRAs
CivitAI is a popular resource for discovering and downloading LoRAs. To find suitable LoRAs:
- Go to the CivitAI website.
- Click on "models."
- Use the filter at the top right to select "LoRA." This displays all available LoRAs.
LoRAs are always trained on a specific base model and perform best when used with that model. For SDXL workflows, select LoRAs trained on SDXL. For Flux, choose LoRAs trained on Flux. The filter function allows sorting by base model.
Each LoRA card on CivitAI indicates the style or subject it specializes in, such as Disney princesses, anime, or pixel art. For this guide, the Dissolve LoRA is used, which creates unique dissolve effects in images. It is available in versions trained on both SDXL and Flux.
A crucial detail is the trigger word associated with each LoRA. The trigger is a specific phrase that must be included in the prompt to activate the LoRA during image generation. For the Dissolve LoRA, the trigger word is "ral-dissolve."
For local ComfyUI installations, download the LoRA file and place it in the "models/Lora" folder within the ComfyUI directory.
For cloud-based setups, such as those running on Lightning AI, construct a URL from the model download link as described in part one of this series.
Integrating LoRA into any ComfyUI Workflow
To use a LoRA in a ComfyUI Text-to-Image or Image-to_Image workflow:
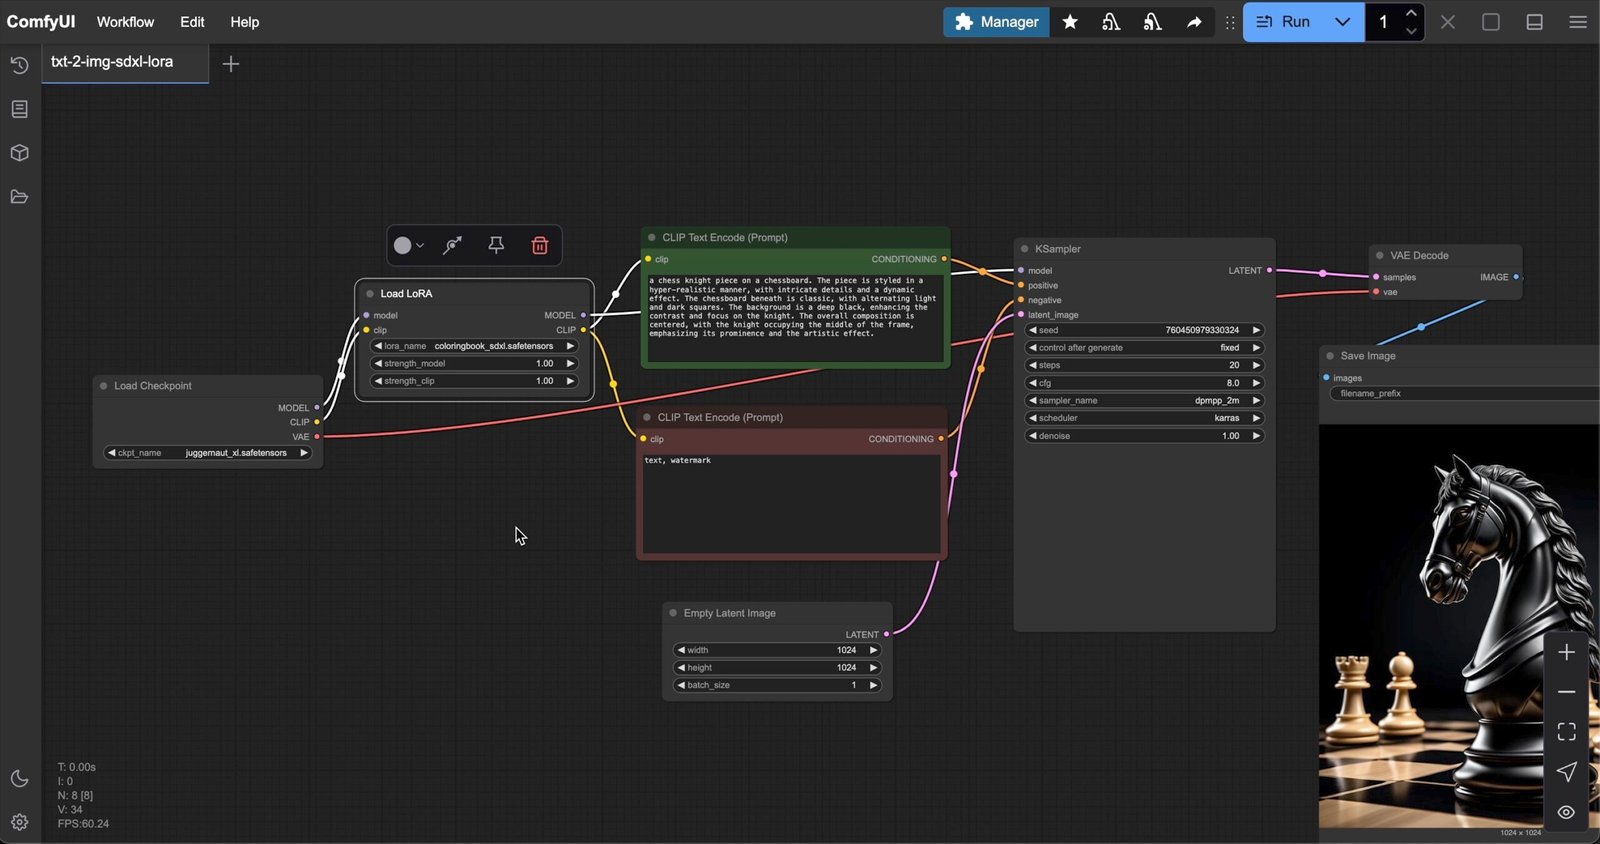
- In the node library, search for the "Load LoRA" node and add it to the canvas.
- The Load LoRA node features model and clip inputs and outputs. Connect it between the Load Checkpoint node and the KSampler node.
- Connect the clip inputs and outputs to the Load Checkpoint node and the Clip Text nodes used for positive and negative prompts.
- Select the appropriate LoRA (e.g., Dissolve for SDXL)
- Add the trigger word to the positive prompt.
- Generate the image to observe the LoRA's effect.
Experimenting with different prompts and settings is encouraged, but always include the trigger word in the prompt.
Adjusting LoRA Settings in ComfyUI
The "Load LoRA" node in ComfyUI provides two important parameters:
-
strength_model: Controls the intensity of the LoRA's effect on the diffusion model (UNet). Higher values (e.g., 1.0 or above) result in more pronounced visual characteristics, while lower values (e.g., 0.5) yield subtler effects.
-
strength_clip: Adjusts the influence of the LoRA on the CLIP model, which handles text encoding. If the LoRA was trained with text encoding (common for trigger words), increasing strength_clip amplifies the impact of trigger words on image generation. Lower values (around 0.5 or less) can sometimes provide better results, especially when the LoRA's text encoding data is limited or when more control over the scene composition is desired.
Conclusion
LoRAs offer a practical and efficient way to customize AI image generation models in ComfyUI, supporting both SDXL and Flux workflows. By understanding how to find, download, and integrate LoRAs, as well as how to adjust their settings, users can unlock a wide range of creative possibilities and achieve more specialized results with minimal effort. Experimenting with different LoRAs and parameters can yield unique visual effects and enhance the overall image generation process.
Download the Workflows
You can download and use all my workflows from my GitHub Page for free.