If you're new to running local large language models like Mistral or LLaMA, you might want to try Ollama - it's super easy and flexible. Plus, it's completely free because it's open-source!
But what if your computer doesn't have enough power to run Ollama smoothly? Or maybe you'd rather not install another tool on your machine and keep it clean? Don't worry, there are other options.
One way is to use Google Colab - I've actually made a tutorial about that, which you can go check out: Running Ollama on Google Colab: A Step-by-Step Guide.
Today, I want to show you how to run Ollama on a cloud development platform called Lightning.ai. And the best part? It's free, although with some limitations.
Lightning.ai is like a super-powered version of Visual Studio Code where you get 15 free credits per month. Each credit is worth $1, and depending on the type of GPU you choose, that can give you up to 22 hours of free GPU time each month.
If you want to learn more about Lightning.ai, check out my tutorial: Forget Colab: Lightning AI Is the FREE Dev Tool I Wish I Knew Sooner!.
If you're more of a visual learner or simply want to see how it's done, I recommend checking out my YouTube tutorial. It covers everything step-by-step.
How you would install Ollama normally
Normally, you'd install Ollama on Lightning AI by running their installation script, which can be found on the Ollama website under "Download" and then "Linux".
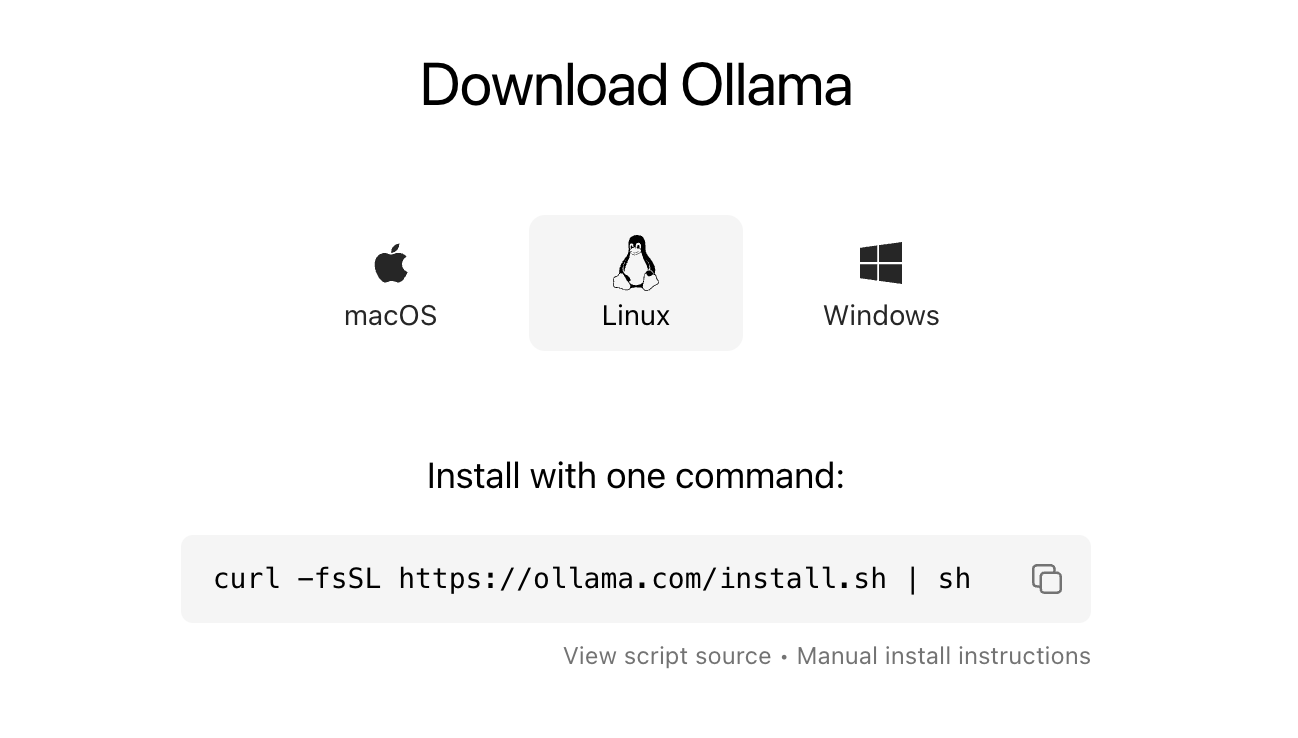
Then, in the Lightning terminal window, you'd run the curl command copied from the Ollama website to install it. However, this script installs Ollama on a non-persistent drive, so each time you open your Lightning studio, you'll need to reinstall it (and all the models you download).
This is due to the way the Ollama script works, which isn't compatible with Lightning's persistent environments as explained in their documentation.
Installing Ollama Persistently on Lightning AI
Instead of running the usual installation command for Ollama on Lightning AI, we'll make a small tweak to the install script itself. This adjustment will allow us to download and install Ollama in a way that persists across sessions in your Lightning studio environment.
Step 1: Modify Ollama Install Script
- Download and modify the Ollama install script using
curl -fsSL https://ollama.com/install.sh > install.sh - Open the downloaded script in file
install.shand replaceOLLAMA_INSTALL_DIRwith the path to your team space file, which is/teamspace/studios/this_studio/. The path to your team space file can be found in the lightning documentation for studio environment persistence.
This means replacing the lineOLLAMA_INSTALL_DIR=$(dirname ${BINDIR})with:
OLLAMA_INSTALL_DIR="/teamspace/studios/this_studio/"
Step 2: Run Modified Script
- Give yourself permission to run the script using the command
chmod +x install.sh - Execute the script using the command
./install.shThis will download and install Ollama along with its dependencies
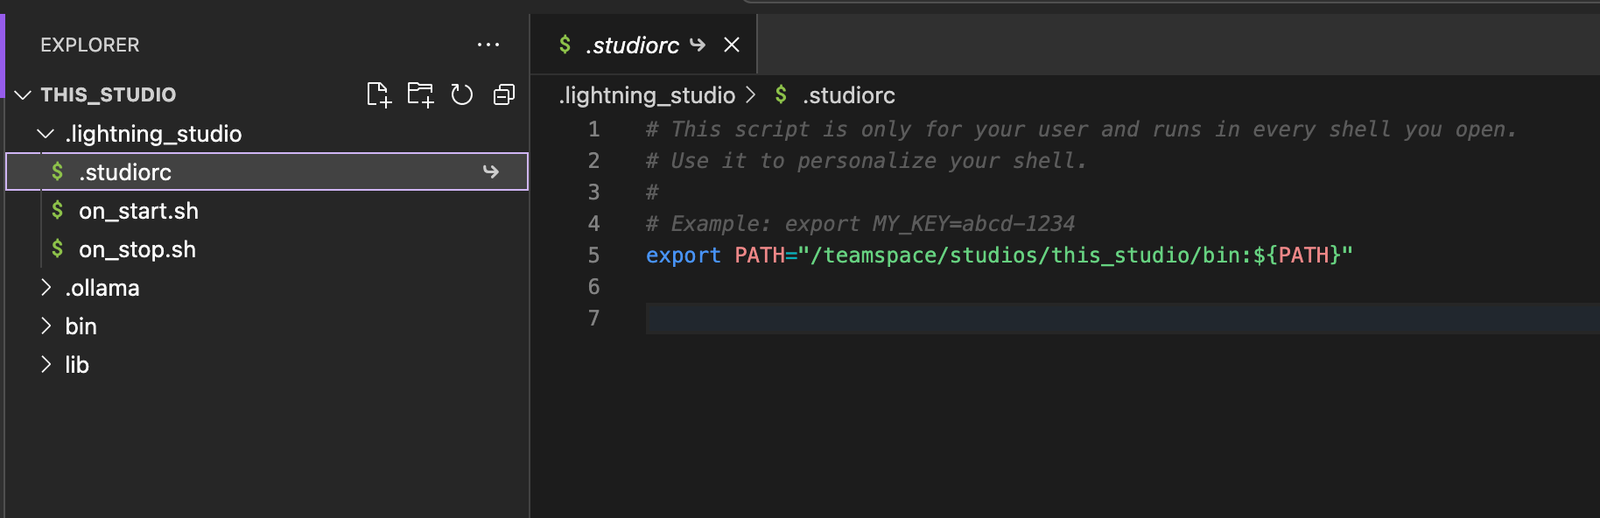
Step 3: Set Path Variable
Next, we need to modify the path variable so that our Studio knows where to find the Ollama installation and can execute commands. Otherwise, any ollama command would not be recognized in your terminal.
- Look for Edit the
.studiorcconfiguration file in the lightning_studio folder. - Add the following line to set the
PATHvariable:export PATH="/teamspace/studios/this_studio/bin:${PATH}" - Restart your Studio
Step 4: Verify Ollama Installation
- Try out the
ollamacommand, which should now be recognized by your Studio - Run
ollama serveto start Ollama in one terminal window - In another terminal window, run
ollama run llama3.1to use the LLaMA 3.1 model with Ollama
If you haven't already, consider renaming your Studio to make it easier to locate in the future. By default, Lightning AI assigns a randomly generated name, which can be unwieldy. Give your Studio a more memorable and descriptive title that suits your needs.
Running Ollama on CPU vs GPU
Your Studio is currently running in CPU mode with 16 GB VRAM. While the LLaMA 3.1 8B model can run on CPU, it will significantly benefit from being executed on a GPU. Lightning AI's free tier offers 15 free monthly tokens, which can be used to switch to GPU mode. This can mean using up to 22 hours of GPU server time per month.
Let's compare how Ollama performs on CPU versus GPU to see if switching is worth it for you.
Running Ollama in CPU Mode
- Start your Studio and observe the status bar until it reaches 100%
- Run Ollama using the command
ollama serve - In a different terminal, run LLaMA in verbose mode using the command:
ollama run llama3.1 --verbose - Ask the LLM a question, such as "where do Llamas live?" This should give us an answer along with the time it took to respond, displayed in seconds.
Running Ollama in GPU Mode
- Click on the Studio Environment button and select "Switch to GPU"
- Choose a GPU server from the list (T4 is the cheapest)
- Once your GPU is ready, try asking the same question again: ""where do Llamas live?". You should notice a significant improvement in the inference speed.