Stable Diffusion is an open-source image generation model that uses artificial intelligence to create stunning, photorealistic images from text prompts or scratch. It's a game-changer for artists, designers, and anyone curious about AI-generated visuals.
To harness the power of Stable Diffusion, you'll need the help of AUTOMATIC1111, a user-friendly interface that simplifies the process of working with this complex model. With AUTOMATIC1111, you can focus on creativity rather than tedious settings adjustments.
In this tutorial, we'll take you by the hand and show you how to get started with Stable Diffusion using AUTOMATIC1111. We'll cover the basics of operating the model, creating your first image, and mastering essential settings such as sampling, CFG scale, and more. Don't worry if you're new to AI-generated art – we've got you covered!
For detailed instructions on how to install AUTOMATIC1111 and get it up and running on your machine, be sure to check out our previous blog post: How to Set up Stable Diffusion on Mac. Once you've got everything set up, come back here and dive into the world of Stable Diffusion!
If you prefer learning through a visual approach or want to gain additional insight into this topic, be sure to check out my YouTube video on this subject!
Create Your First Image
Step 1: Open Terminal and Navigate to Folder
Open the Terminal app on your Mac and run the command cd stable-diffusion-webui to navigate to the folder where the Stable Diffusion Web UI is located. Depending on where you have installed Stable Diffusion Web UI, you may have to change the folder location.
Step 2: Run the Web UI
Once in the correct folder, run the command ./webui.sh and hit ENTER to start the Stable Diffusion Web UI locally on your Mac.
Step 3: Accessing the Web UI
To access the Stable Diffusion Web UI, copy the URL displayed in the Terminal app and paste it into your browser. This will open the web interface.
Step 4: Create Your First Image
- Insert a prompt and click "Generate" to create your first image.
- For example, you can say "photo of a cute unicorn in a green forest in the style of Japanese anime".
- Observe how the UI works by switching to the terminal to see what Stable Diffusion is doing.

Understanding Sampling Methods in Stable Diffusion
What is a Sampling Method?
A sampling method is an algorithm used to generate images from text prompts using Stable Diffusion.
The Process of Image Generation
The process starts with a canvas full of noise and gradually removes the noise to match the text prompt. Each iteration is called a "Sampling Step", which can be controlled using the Sampling Control in the Stable Diffusion Web UI.
Choosing the Right Sampling Method
Different sampling methods are available, each with its own advantages and disadvantages. Some methods are faster, while others produce higher quality or more diverse images. Choosing the right method depends on your goals and desired image resolution.
Here are my top picks:
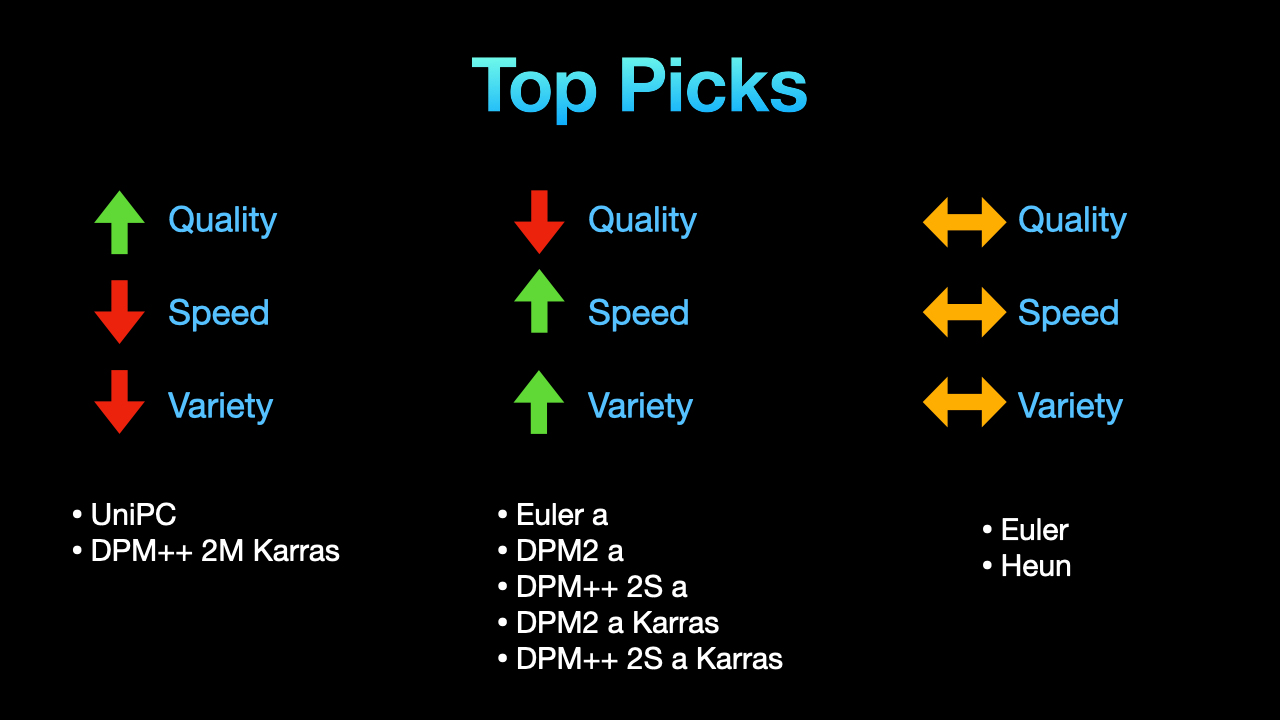
DPM++ 2M Karras/UniPC
- Best for getting clear, detailed images with high accuracy and realism.
- Slow and less varied, but predictable results.
Ancestral Samplers (Euler a/DPM2 a)
- Quick, diverse, and creative images.
- Sacrifices some accuracy, introducing noise and flaws.
- Recognizable by the presence of the letter "a" in their name.
Basic Samplers (Euler/Heun)
- Balances quality, speed, and variety with moderate errors.
- Middle-ground choice for a good starting point.
My recommendation for beginners: Euler. It's a simple and foundational choice for learning Stable Diffusion. And it provides decent pictures with good speed and variety.
Step Count
The step count is the number of iterations Stable Diffusion goes through to remove noise from the initial image.
- Ancestral samplers change significantly with more steps.
- Other sampling methods stay consistent after reaching a certain output.
- A step count between 20-40 is a good starting point for beginners.
Understanding CFG Scale (Classifier Free Guidance)
CFG scale, or "Classifier Free Guidance" scale, determines how closely Stable Diffusion follows your text prompt.
How CFG Scale Affects Image Generation
- Lower CFG scale: More creative output, but may not match the prompt well.
- Higher CFG scale: Sticks to the prompt more closely, but may not always result in a good image.
Default Setting and Experimentation
- Default setting: 7 (a good starting point)
- Experiment with different scales to find what works best for you
Sampling Method and CFG Scale Interaction
The quality of generated images depends on the sampling method chosen. For example, Euler a may not generate good images at low or high CFG scale settings.
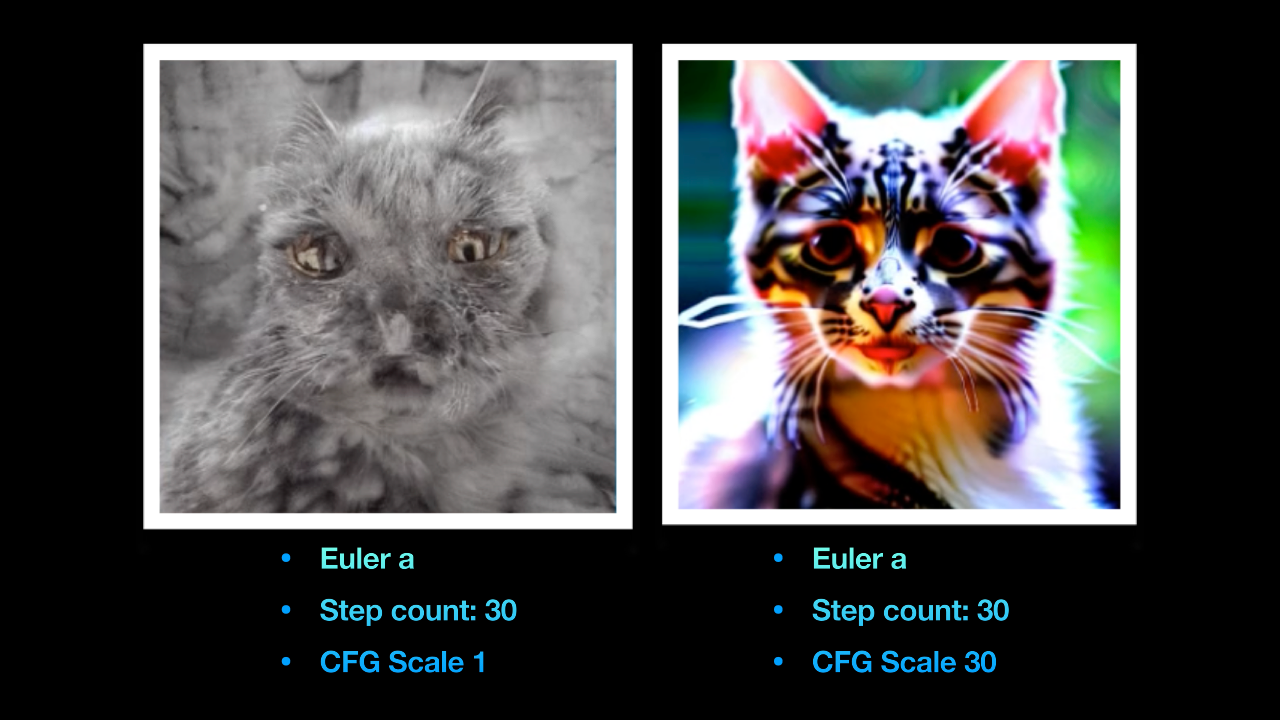
As a beginner, stick to the range of 3-7 for the CFG scale and experiment with different scales to find what works best for you.
Understanding Image Size and Dimensions
- Image Width: The width of the image, measured in pixels.
- Image Height: The height of the image, measured in pixels.
The default image size for Stable Diffusion generation 1 models is 512x512 pixels. For SDXL models its 1024 x 1024.
As a beginner, sticking to the default dimensions can save you time and computational resources. Generating higher-resolution images takes more processing power, so it's best to start with lower dimensions. You can always increase the image size later or upscale the image afterward using other tools.
Understanding Batch Count and Size
- Batch Count: The number of times the image generation process is run.
- Batch Size: The number of images generated each time the process is run.
The default settings are:
- Batch count: 1
- Batch size: 1
If you raise the batch count to 4, Stable Diffusion will run the process 4 times, generating one image each time.
Result: You'll have a total of 5 images (one combined image and four individual images).
If you increase the batch size to 2, this means Stable Diffusion will create 2 images with each run.
Since the batch count is set to 4, it will generate:
- 4 times 2 = 8 images
Result: You'll have a total of 9 images (one combined image and eight individual images).
Important Considerations
- GPU Memory: Increasing the batch size requires more GPU memory. However, increasing the batch count doesn't.
- Performance: Batch count and size can affect performance. If you're short on RAM, it's better to raise the batch count rather than the batch size.
Remember to experiment with different batch counts and sizes to find what works best for your Stable Diffusion workflow!
Understanding Seeds in Stable Diffusion
In machine learning, a seed is a numerical value that guides how random a computer program behaves.
Default Seed and its Effects
- The default seed in Stable Diffusion is negative one (
-1). - This seed generates different images each time.
- To get the same image again, click the green recycling button to lock the seed.
Using Seeds for Reproducibility and Variation
- Locking a seed recreates an identical image under the same conditions.
- Seeds can also be used to generate new images with similar characteristics while introducing minor variations.
Advanced Seed Settings: "Extra" and "Variation Strength"
- The "Extra" box in Stable Diffusion opens advanced seed settings.
- These settings allow you to combine different seeds, creating unique images that blend characteristics from multiple sources.
- Use the "Variation Strength" slider to control how much of each seed is used.
Blending Seeds for Creative Control
- Start with two different seeds and adjust the "Variation Strength" slider to blend them.
- Move the slider towards 0.5 to combine the characteristics of both seeds, creating a new image that's neither entirely one nor the other.
Image Management in Stable Diffusion
Autosaving Images
- Stable Diffusion has an autosave feature that saves generated images in a dedicated folder.
- The default location for autosaved images is under
Home > Stable Diffusion Web UI > Outputs > Text-to-Image Images. - You can modify the default location by adjusting settings in the "Paths for Saving" section.
Customizing Autosaving
- To disable autosaving, uncheck the box labeled "Always save all generated images" in the Settings tab.
- Adjust settings like file endings and naming conventions to customize your image saves.
The "Save" Button
- When you generate an image and click Save, it gets stored in two locations:
- The designated folder under Outputs for autosaved images.
- A CSV file containing generation settings (prompt, size, sampler, seed, and CFG scale) is saved in the "Logs Images" folder.
Manual Saving
- You can save images manually by clicking Save or using the other buttons:
- Send to Img2Img: Transfer selected image to the Img2Img section.
- Send to Inpaint: Directly send the image and prompt to the Inpaint section.
- Send to Extras: Send the image and prompt to the Extras section.
Zipping Images
- Use the Zip button to compress selected images into a zip file, which is stored in the saved-images folder.
Opening Folders
- The Open Folder button opens the folder where your autosaved images are stored (if enabled).
- On a Mac, this will open Finder to the corresponding folder.
Generate Forever, Interrupt, and Skip Options
Generate Forever
- Right-click on the "Generate" button to access the "Generate Forever" option.
- This feature keeps generating images continuously, ignoring batch counts.
- Useful for experimenting with different Stable Diffusion settings without restarting the generation process.
Important: To stop the continuous generation, right-click again and select "Cancel Generate Forever". Stable Diffusion will complete processing the current image and then stop.
Interrupt
- When using the "Generate" button, two new options appear: "Interrupt" and "Skip".
- "Interrupt" stops processing the image and returns whatever results were created so far.
- If autosave is enabled, the current image will be saved.
Skip
- "Skip" means you want to stop the generation and discard the current output.