If you've been playing around with Stable Diffusion, the AI image generation model, you might've heard of ComfyUI - its powerful interface that's actually more "confusing UI" than comfy.
Don't let that scare you off, though! ComfyUI is actually one of the BEST ways to run Stable Diffusion, offering flexibility, control, and speed. Its node-based interface is optimized for efficiency, making image generation quicker than other UIs like AUTOMATIC1111.
But what if you don't have the GPU power or prefer not to clutter your system with multiple installations? That's where Lightning AI comes in - a platform that lets you access up to 22 free GPU hours per month.
This guide will walk you through the process of setting up and running ComfyUI on Lightning AI, allowing you to harness cloud-based GPU resources for efficient AI image generation.
If you're more of a visual learner or simply want to see how it's done, I recommend checking out my YouTube tutorial. It covers everything step-by-step.
Setting Up Lightning AI
- Sign up for Lightning AI at their website.
- Create a new studio by selecting the "Code" environment.
- Delete the default
main.pyfile in your new studio.
For more information on lightning.ai, checkout my latest post Forget Colab: Lightning AI Is the FREE Dev Tool I Wish I Knew Sooner!
Installing ComfyUI
- Open a new Terminal window in your studio.
- Clone the ComfyUI repository:
git clone https://github.com/comfyanonymous/ComfyUI.git - Install the required dependencies:
pip install -r ComfyUI/requirements.txt
Installing ComfyUI Manager (Optional but Recommended)
- Clone the ComfyUI Manager repository:
git clone https://github.com/ltdrdata/ComfyUI-Manager.git ComfyUI/custom_nodes/ComfyUI-Manager - Install the manager's dependencies:
pip install -r ComfyUI/custom_nodes/ComfyUI-Manager/requirements.txt
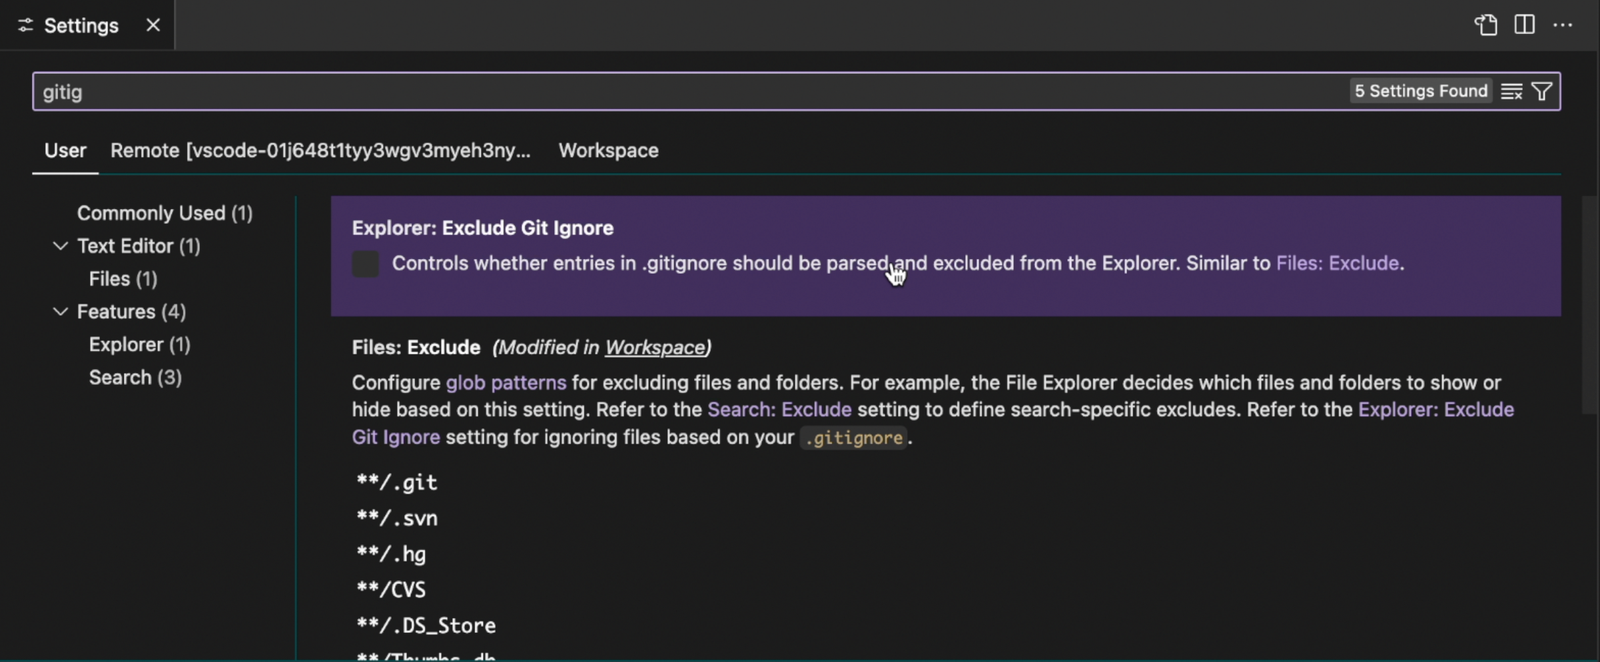
If you don't see the
custom_nodesfolder, it might be due to a setting in Lightning AI. To fix this, go to Visual Studio Code's settings (found at the bottom left corner of your screen). Search for "gitignore", and ensure that the "Explorer: Exclude Git Ignore" setting has been unchecked. This should reveal all hidden folders, includingcustom_nodes.
Running ComfyUI
- Switch to GPU mode in Lightning AI:
- Click on the Studio Environment button.
- Select "Switch to GPU" and choose a GPU server.
- Check "Remember last used machine" for future sessions.

- Run ComfyUI:
python ComfyUI/main.py
Connecting to ComfyUI
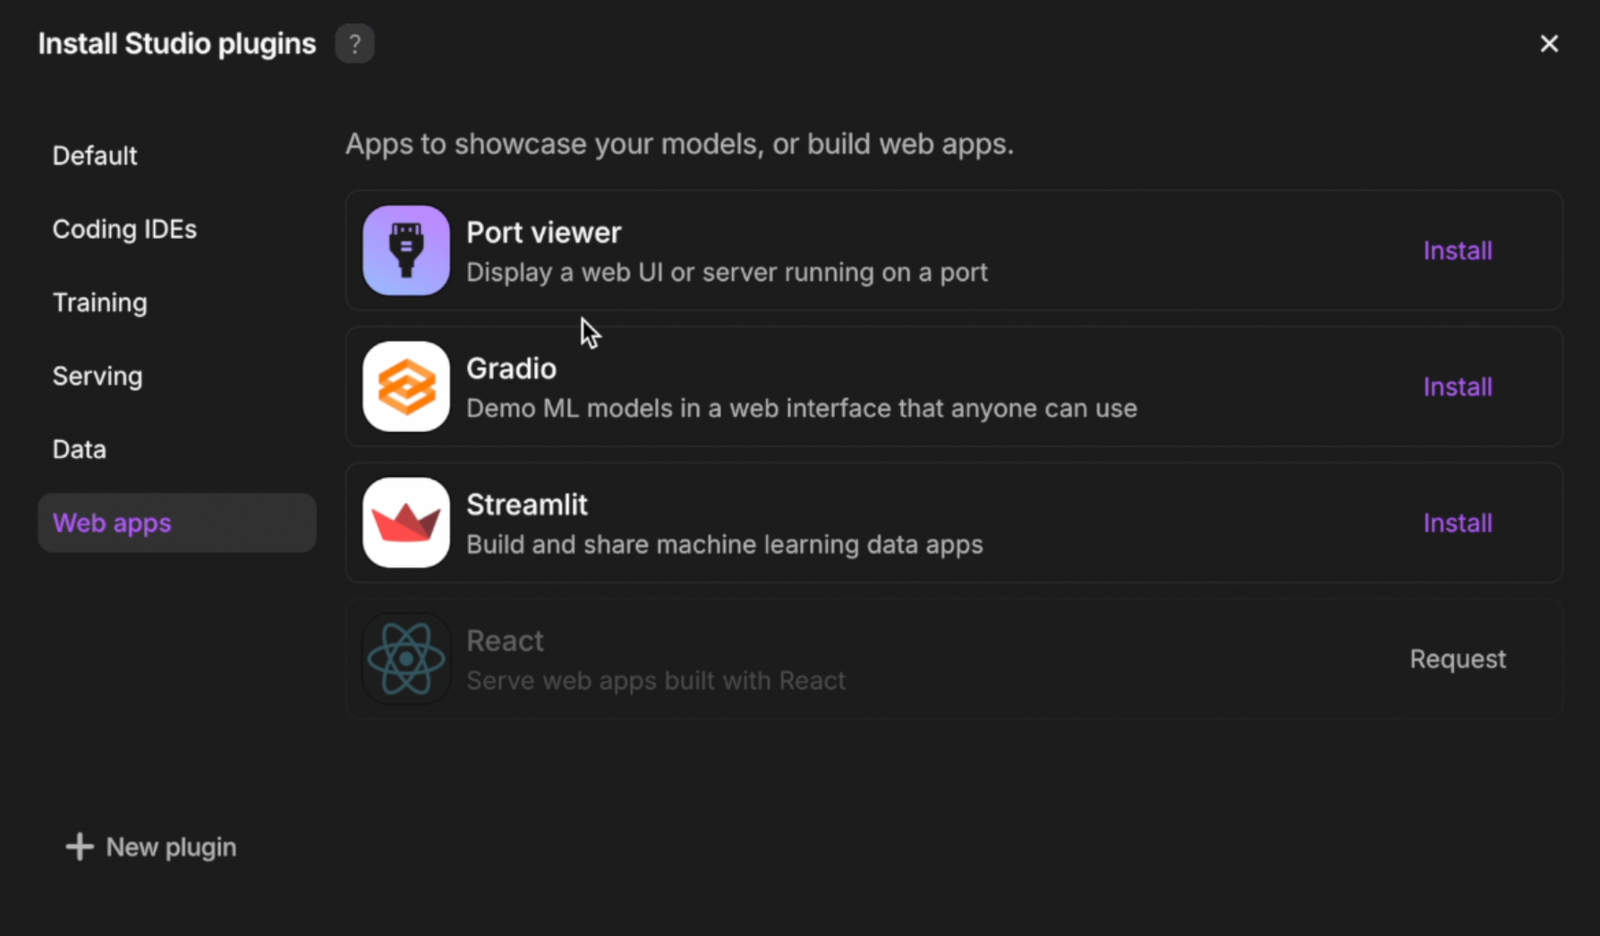
- Install the Port Viewer plugin in Lightning AI.
-
Create a new port:
- Label it "Stable Diffusion on Comfy UI"
- Set the port number to 8188
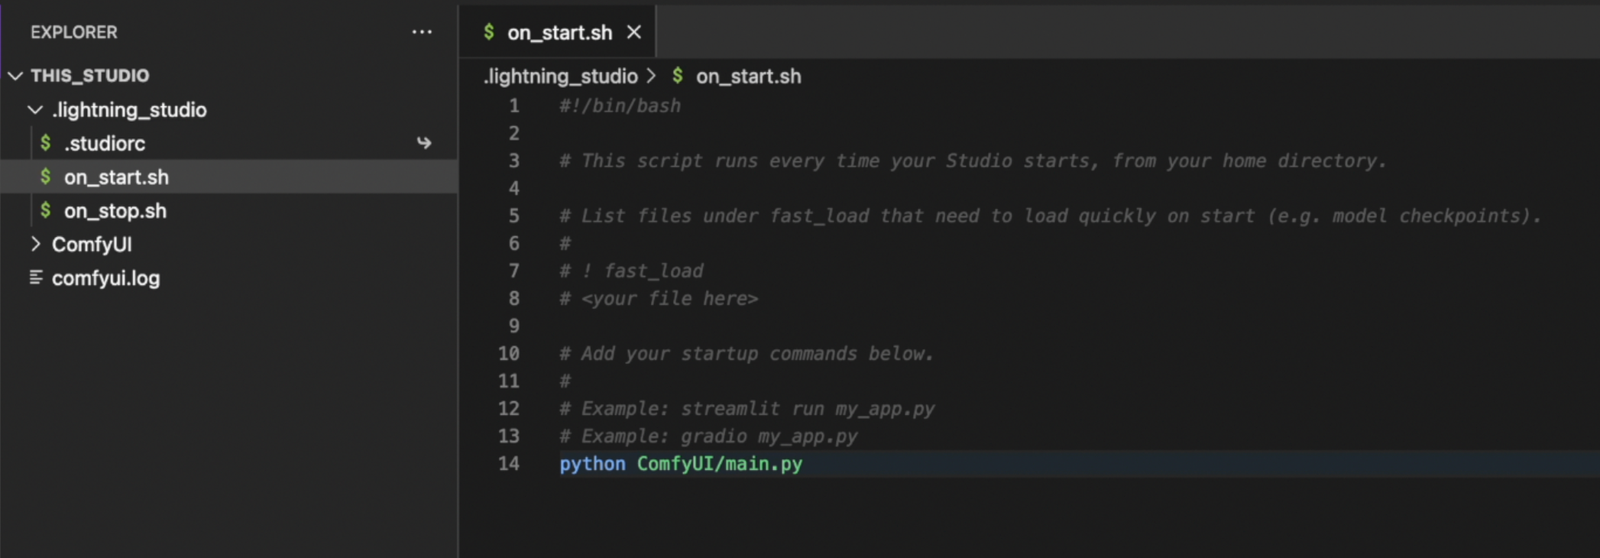
Automating ComfyUI Startup
- Add the ComfyUI start command to the
on_start.shscript in your studio.
Downloading Checkpoint Files
There are three methods to download model checkpoint files:
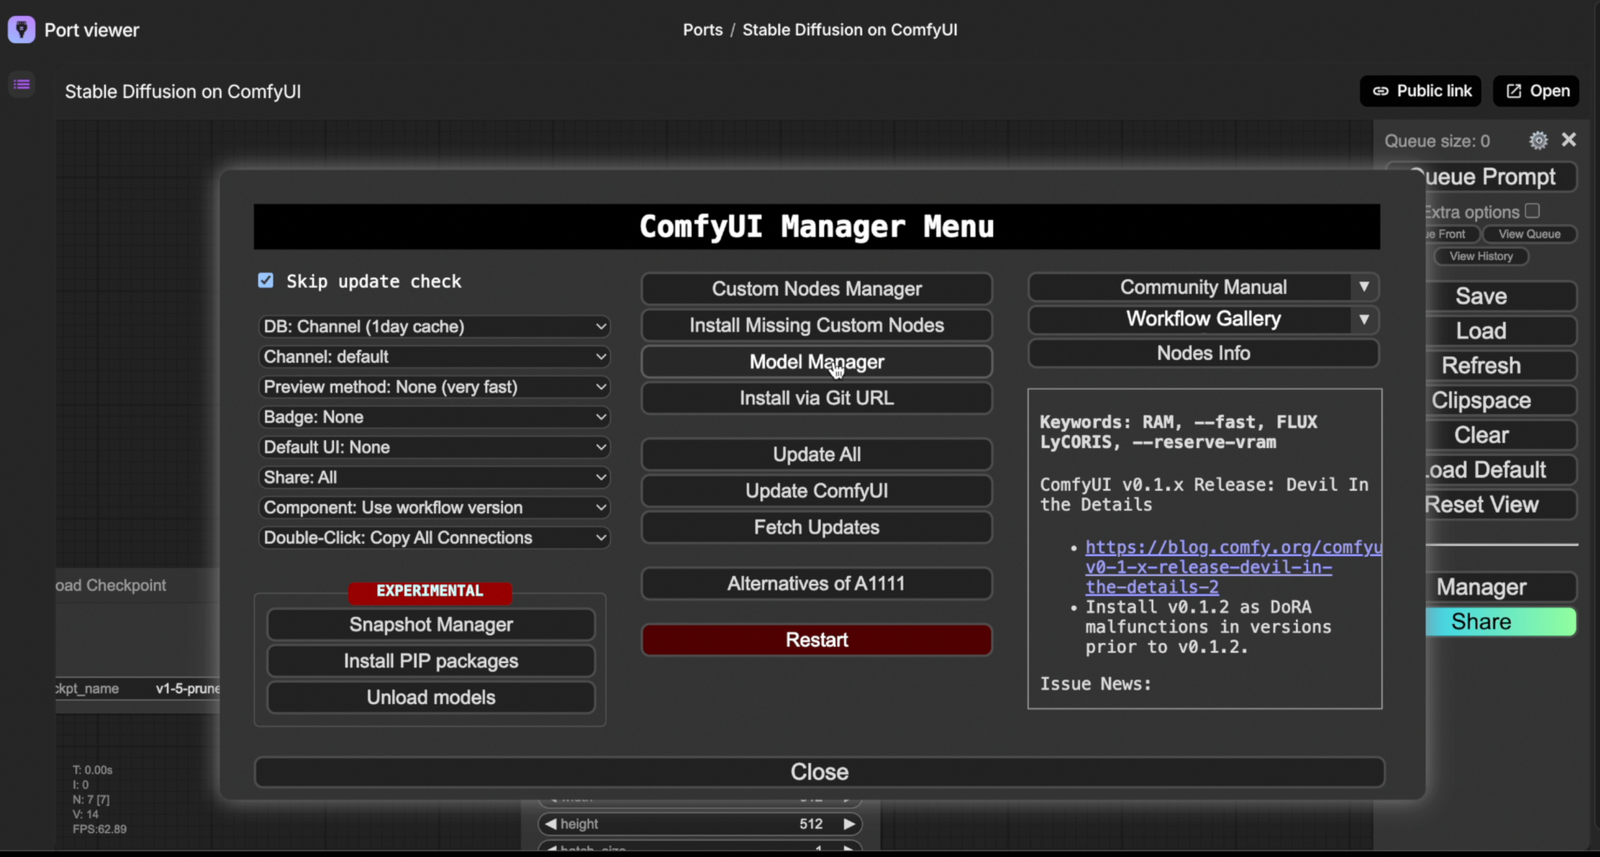
Using ComfyUI Manager
- In ComfyUI, click "Manager" then "Model Manager".
- Search for "checkpoint" to filter results.
- Find and install desired models (e.g., SDXL Turbo).
- Click "Refresh" in ComfyUI to see new models.
Direct Download from Model Websites
The second way of downloading models is via the terminal. There are many models available out there, and you can find them on websites such as HuggingFace or CivitAI.
Go to the model page for the one you'd like to download - let's take the Juggernaut XL model as an example.
To download the checkpoint file, you'll need to run a specific command in the terminal within Lightning Studio – its format should look something like this:
wget -O ComfyUI/models/checkpoints/<MODEL_NAME>.safetensors "<DOWNLOAD_URL>&token=<API_TOKEN>"
Here's how to break down the command:
<MODEL_NAME>is where you'll enter the downloaded file's name, making it easy to recognize later. For example, we could call itJuggernaut_XL_Hyper<DOWNLOAD_URL>comes from copying the link address of the specific model version's download button on civit.ai by right-clicking and selecting "Copy link address". The resulting URL is https://civitai.com/api/download/models/471120?type=Model&format=SafeTensor&size=full&fp=fp16.<API_TOKEN>is your unique API key from civit.ai – you might not need this for every model, especially those that can be downloaded without logging in. For models requiring an account, sign up, create an API key under Account Settings > API keys, generate a new one, name it, and you're all set! Keep in mind to safeguard your API key. Once I've completed this tutorial, I'll revoke it straight away.
In our case example, here's what the command could look like:
wget -O ComfyUI/models/checkpoints/Juggernaut_XL_Hyper.safetensors "https://civitai.com/api/download/models/471120?type=Model&format=SafeTensor&size=full&fp=fp16&token=275dd0a429d0edff942e913565e4e63d"
Download from HuggingFace
To download models from Hugging Face to your Lightning AI studio, you'll need to install the Hugging Face CLI first, then authenticate, and finally download your models. Here's how to do it step by step:
- First off, you will need to generate a HuggingFace Token which you will find in your HuggingFace account under "Access Tokens"
- Install the Hugging Face CLI with its dependencies:
pip install -U "huggingface_hub[cli]" - Authenticate with HuggingFace:
huggingface-cli loginWhen prompted, enter your token. Alternatively, you can use:
huggingface-cli login --token $HUGGINGFACE_TOKEN - Download HuggingFace Models
Now you can download models using:huggingface-cli download MODEL_REPO_ID FILENAME --local-dir YOUR_DESTINATION_PATHFor example, to download Flux Dev:
huggingface-cli download black-forest-labs/FLUX.1-dev flux1-dev.safetensors --local-dir ComfyUI/models/checkpoints/
Uploading Local Files
- Navigate to the "comfyui/models/checkpoints" folder in your studio.
- Right-click and choose "upload" to add local checkpoint files.
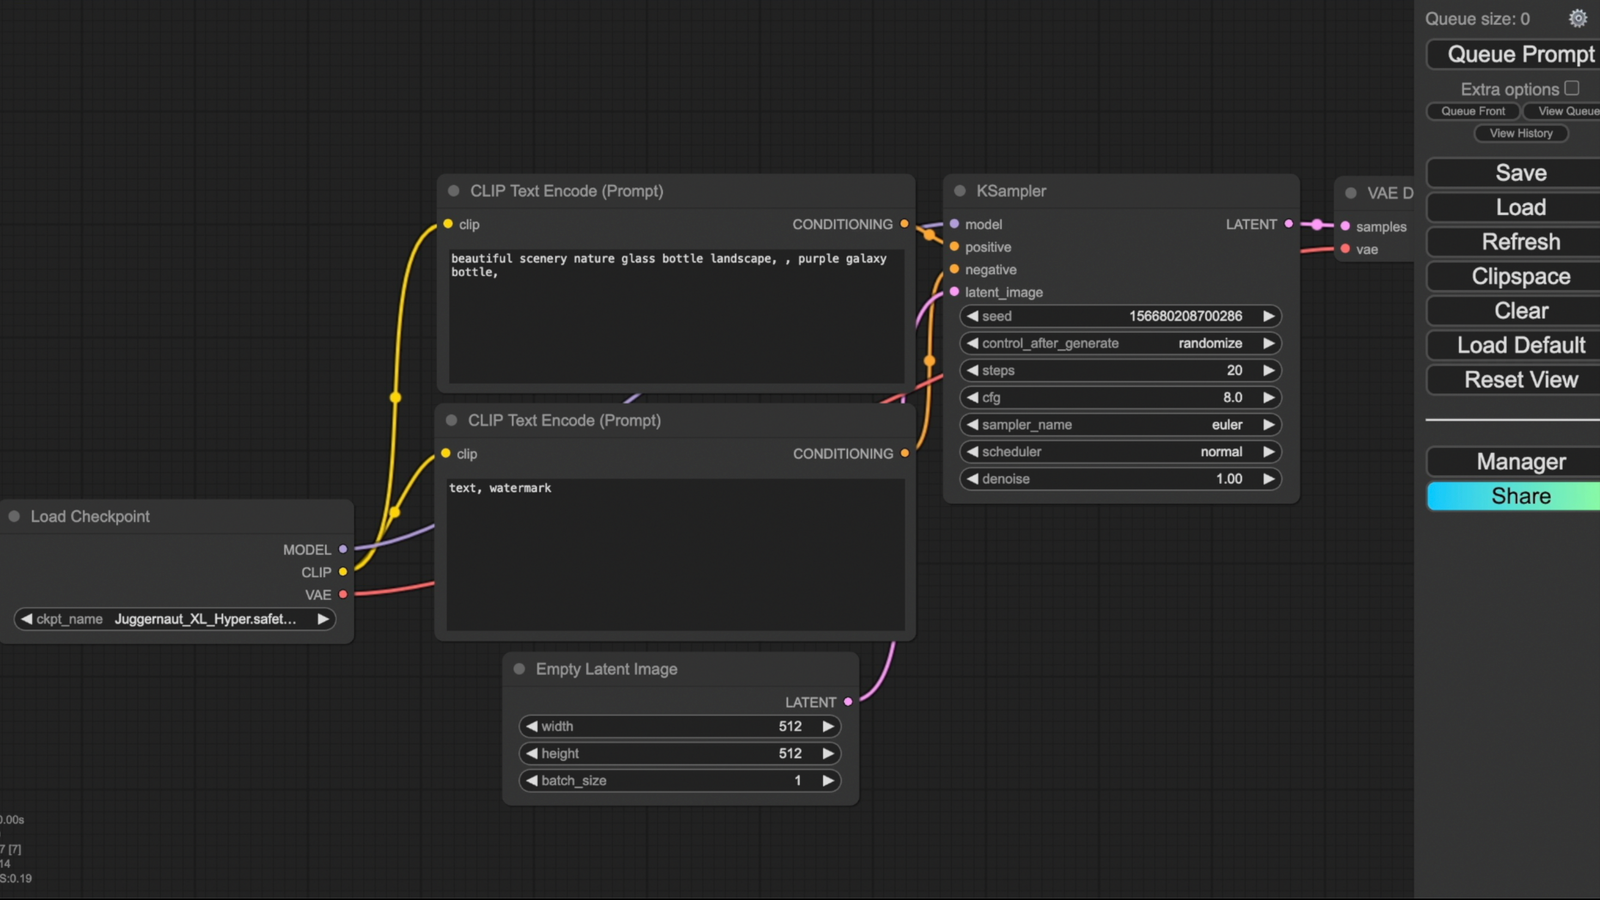
Using ComfyUI for Image Generation
- Launch your studio and wait for it to load.
- Open ComfyUI through the Port Viewer plugin.
- In the node-based interface:
- Select your downloaded checkpoint.
- Adjust image settings (e.g., resolution for SDXL models).
- Modify prompts and other parameters as needed.
- Click "Queue Prompt" to generate an image.
- Right-click on the generated image to download it.
By following these steps, you can efficiently run ComfyUI on Lightning AI, leveraging cloud-based GPU resources for AI image generation without cluttering your local system.
Download the Workflow
You can download the workflow shown in this tutorial here.
ComfyUI Masterclass Part 2
In part 2 of the ComfyUI Masterclass series, we explore the ComfyUI interface, essential node types, and how to build a complete text-to-image workflow from scratch, including workflow organization techniques.