If you're reading this without first diving into the basics, let me catch you up: Stable Diffusion is a powerful AI software that creates images based on text prompts. You can influence the output by using positive and negative prompts – positive prompts tell the software what to include in the image, while negative prompts guide it on what to avoid.
If you've already read Part 1: Mastering the Prompt Formula, congratulations! You're now familiar with the essential components that make up an effective prompt formula. In this second part, we'll take your knowledge to the next level by exploring advanced techniques for optimizing your prompts.
If you prefer learning through a visual approach or want to gain additional insight into this topic, be sure to check out my YouTube video on this subject!
Part 2 - Advanced Techniques for Optimizing Your Prompts
While mastering the basics of prompt writing is essential, there's more to unlocking the full potential of Stable Diffusion than just getting the fundamentals right. Fortunately, there are several advanced techniques you can apply to take your prompts – and your results – to the next level.
Let's get straight to it.
1. Using Weights in Your Prompts
Weights for prompts are a way of controlling how much influence each word or phrase has on the image generation process. While it's not a sure thing, weights can help guide Stable Diffusion pay more attention to certain words and pay less attention to others.
The weighting system ranges from 0 to 2. 0 is the minimum weight, and 2 is the maximum weight. If you go above 1, it boosts the importance of a phrase, and going below 1 reduces its significance. Boosting means Stable Diffusion focuses more on the emphasized phrase, increasing the likelihood of it being generated. On the other hand, reducing emphasis means Stable Diffusion pays less attention to the de-emphasized phrase, lowering the chance of it being generated.
You can group words or phrases with parentheses and assign weights to them like so:
(phrase:1.2)So, in my image of the cute black cat with blue eyes, initially, Stable Diffusion missed the detail of the red collar. But when I added weight to the phrase "wearing a red collar," Stable Diffusion picked up on it and added the red collar to the image. This is my prompt with the weights added:
cute black cat with blue eyes (wearing a red collar: 1.5) lying on a tableYou're free to pick any number from 0 to 2 for the weight. Based on my own experience, going beyond 1.7 or below 0.5 can mess up the image.
2. Negative Prompts
Negative prompts serve to specify what the image should avoid containing, helping you in steering clear of undesired elements or reducing ambiguity in image generation. For instance, to generate an image of a bustling city at night without people, use the negative prompt "people".
You can also apply weights to your negative prompts to emphasise elements that you don't want in you image.
You might wonder: Why have a positive prompt and a negative prompt? Why not include things to avoid in the positive prompt?
The reason for separating positive and negative prompts is to provide clearer instructions to the model. Mixing them can confuse the model, making it more challenging to generate the desired image. By using positive prompts to specify what you want and negative prompts to specify what you don't want, you offer the AI model distinct instructions, leading to improved results.
3. Prompt Editing
Prompt editing gives you more control. You can make Stable Diffusion generate specific subjects later in the sampling cycle, switch subjects, or even remove parts of the prompt while generating.
Prompt editing allows you to start sampling one picture, but in the middle swap to something else.
Switch Phrases after X Steps
The base syntax is:
[phrase1:phrase2:X]X is a number indicating at which step to switch during the sampling cycle. The higher this number, the later the switch happens, and the model has less power to replace phrase1 with phrase2.
Example:
a portrait of [Johnny Depp:Idris Elba:16]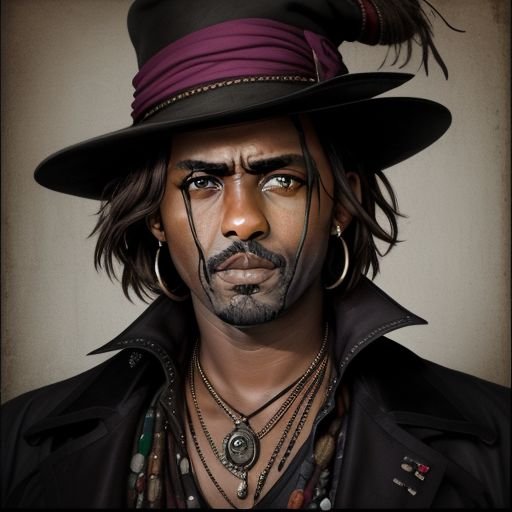
At start, the model will be drawing a portrait of Johnny Depp.
After step 16, it will switch to drawing a portrait of Idris Elba, continuing from where it stopped with Johnny Depp.
Add Phrase after X Steps
The base syntax is:
[phrase:X]Example:
A fantasy landscape [with a lake:15]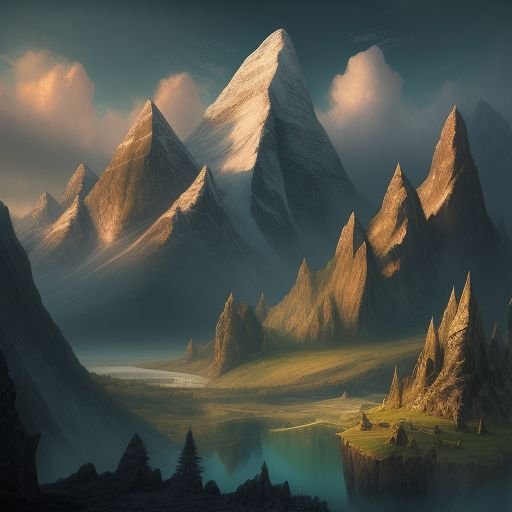
At start, the model will be generating a fantasy landscape. After step 15, it will switch to generating a fantasy landscape with a lake, but continuing where it stopped with fantasy landscape without the lake.
Remove Phrase after X Steps
The base syntax is:
[phrase::X]Example:
A bar [with red neon light::9]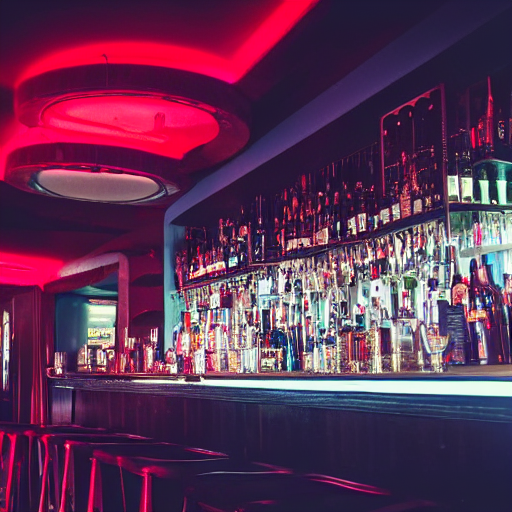
At first, Stable Diffusion will generate an image of a bar with red neon light. After 12 steps, it will switch to create an image of a bar, but based on the image of a bar with red neon light.
Alternate Between Phrases
The base syntax is:
[phrase1|phrase2]Example:
A [pig|monkey] in a barn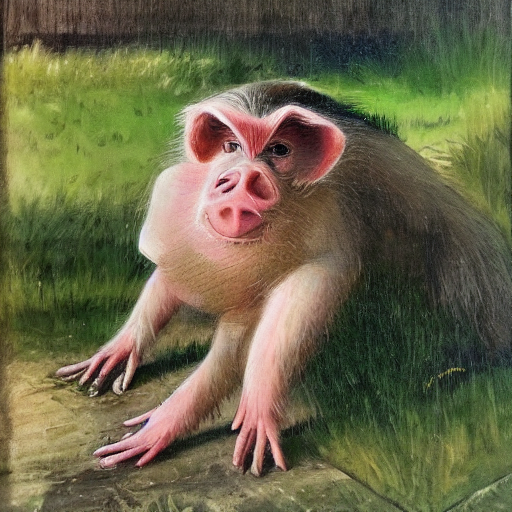
Stable Diffusion switches back and forth between creating an image of a pig in a barn and a monkey in a barn in each step.
You can expand this syntax to more than 2 phrases. In that case, Stable Diffusion will cycle through phrases 1, 2, up to N, and then loop back to phrase 1:
[phrase1|phrase2|...|phraseN] - alternates between phrase1 ... phraseN, then loops back to phrase14. Other Factors Affecting your Prompt
Now that you understand how to construct a prompt — utilizing a prompt formula, incorporating weights, and employing negative prompts — yet your image doesn't quite match your vision, what's the issue? What can you do?
Several influencing factors come into play in how the image is generated, irrespective of how skillfully you formulate your prompt.
- The model: The model you pick for making images is crucial for what you create. For instance, if you use a super specific model tuned for Anime, it might not be great at making realistic photos. Always be mindful of the model you choose. You can find more info on models and their diffferences in my post that goes into the different Stable Diffusion models.
- Add-ons: With Stable Diffusion, you can use extensions that impact how your images turn out. Here are a few examples:
- LoRA models: These are small neural networks specialized in generating specific details like faces, hands, or clothing. Boost your Stable Diffusion results by applying them to a compatible model.
- Refiners: Specialized models for the final denoising steps in the diffusion process. Apply them to the generated latents from the base model, using the same text prompt, for sharper and more realistic images.
- ControlNet: This extension lets you control the pose, color, and content of your images using a reference image. Whether mimicking an existing style or crafting custom images, ControlNet gives you more flexibility and precision.
When generating images using AI, providing a good prompt is essential for obtaining desired results. Here are some rules and tips for describing a good prompt:
-
Be Clear and Specific: Clearly articulate what you want in the image. Use specific details and avoid ambiguity.
-
Include Key Elements: Mention important elements, objects, or characteristics you want in the image. This helps the AI understand your expectations.
-
Consider Style and Mood: Describe the desired style or mood for the image. Specify if you want it realistic, surreal, colorful, etc.
-
Use Descriptive Language: Utilize vivid and descriptive language to convey your vision. Paint a clear picture with words.
-
Experiment and Iterate: If the initial result is not what you want, iterate and experiment with different phrasings or additional details in your prompt.
-
Provide Context: Give context or background information if needed. This helps the AI understand the scene or scenario you have in mind.
-
Use Reference Images: If applicable, provide reference images or examples to illustrate your vision better.
-
Avoid Ambiguity: Minimize ambiguous terms or conflicting instructions. The more precise, the better.
-
Consider Composition: Describe the arrangement of elements in the image. Specify the composition and spatial relationships.
-
Experiment with Parameters: Some AI models allow you to tweak parameters. Experiment with these to fine-tune the output to your liking.
Remember, the effectiveness of the prompt may depend on the specific AI model or platform you are using. It's often helpful to review the guidelines provided by the AI service you're working with to understand how to formulate prompts effectively.
Pro Tip: Continue experimenting, combining different elements, and consistently seek new ways to enhance your prompts. Gain insights from others, perhaps by exploring platforms like Prompt Hero on the internet. In my experience, Leonardo.AI stands out as one of the finest websites for prompt learning. Not only does it provide an excellent AI image generation tool, but it also features a wealth of community images, allowing you to observe what prompts people used and learn from their approaches. To find additional details about Leonardo AI, check out the playlist I curated on YouTube.